Gallery Submission for Project 2
Gallery Submission for Project 3
Gallery Submission for Project 1
I have attached my group’s final project below! I have enjoyed getting to know my group members and collaborating on this project for the past few weeks!
group project by MawdI will also attach the link to the presentation: https://canva.link/cwr3fpflqgeebhw
— Sofia
What were my learning goals, and what was my initial knowledge?
At the beginning of the course, I didn’t know what a PLN was or how it could fit into my digital identity. I was comfortable with the use of technology but skeptical of how social media and online platforms could be integrated responsibly into education. I had a network through social media platforms and other online engagement platforms like Reddit and LinkedIn, but I didn’t know why it was important to have a PLN or how it could benefit personal and professional growth.
My main learning goal from the start of the course was to continue my growth in the area of EdTech, with the hopes of exploring new ways that I can engage meaningfully with my future students. I think that I have definitely achieved this goal. As I previously mentioned, at the beginning of the course, I was concerned about social media, AI, and other technologies in schools, but now, I understand their importance, and I feel more inspired about how I can transfer this knowledge to my future students.
How has my intellectual, professional, and digital literacy grown? What were my challenges and how did I address them?
Initially, I thought of digital identities mainly as they relate to your digital footprint, but early in the course, the provided resource was the press conference on the value of digital identity for the global economy and society from the World Economic Forum 2019, which shifted my thinking about what a digital identity could be. The selected speakers had many interesting thoughts to share about how digital identities could provide aid for individuals without an ID of their own, and the economic and security implications of businesses using this kind of technology.
Something that was also a big growth area for me was learning about digital privacy laws for our week 5 blog post on AI and social media. I always had a vague idea about how data could be stored and used, but I had no idea the specific things that laws like PIPEDA involved. This blog post allowed me to explore more about PIPEDA before answering and reflecting on the blog questions. What I learned is that there are more regulations than I thought in Canada, and that BC has its own regulations related to public sector organizations like schools and hospitals.
Another key takeaway for me has been to reach further with my exploration and include more resources to back up what I’m thinking. This was a general piece of feedback from our instructor about making sure to include research and reliable sources when making general statements. I have kept that in my mind as I have researched and sourced my blog posts to ensure that my posts are clear and helpful to someone who wants to learn more about our course topics.
My goals for future professional learning are as follows:
- To participate in AI training related to its use in the classroom
- To connect with more educators whom I meet in person in order to grow my online PLN
- To learn more about privacy laws as they relate to educational activities.
Overall Thoughts and Takeaways
I have found this course very helpful to deepen my knowledge about how technology, social media, and PLNs can be integrated into the classroom and how they can be relevant to my professional learning journey. In the future, I hope to engage with my PLN more meaningfully and explore more professional learning opportunities related to teaching.
— Sofia
(Here is my favourite goodbye song)
This week, I chose to review my classmate Evelyn Schoahs’ blog post on PLNs and Education. I loved what Evelyn had to say about her PLN and learning goals moving forward as a future teacher.
What I loved about Evelyn’s blog post!
I loved hearing about what kinds of social media platforms Evelyn uses for school/work, but also for creative projects. I love using Pinterest as well because it can be a great source of inspiration, but it doesn’t suck me in as other platforms do sometimes. I also resonated with Evelyn’s reflection on professional platforms and teacher networks. I am also trying to make more of an effort to incorporate those networks into my PLN.
While reading Evelyn’s post, I came across a new resource, the EdCan Network. I hadn’t explored this resource before, so I was glad to learn about it from Evelyn! It seems really useful for finding a community of other educators and for accessing professional development support. I’ll be sure to explore this resource more in the future as I develop my teaching practice!
The place of AI in the classroom is something that is becoming more and more important to think about. I agree with Evelyn that it is important for students to learn about how to use AI properly so that they can engage with AI online. I am also hesitant about the use of AI in the classroom and hope to explore opportunities to learn more about how I can teach students about it effectively. I appreciated how Evelyn linked her thoughts to our course readings!
Finally, I resonated with Evelyn’s closing thoughts about how it can be hard to engage with a diversity of perspectives and platforms. I am also trying to seek out new connections and leaders in the field of education that I can get inspired by. I follow the blog of the superintendent from where I grew up, Chris Kennedy, who recommended an author with interesting thoughts to share about education and some connections on LinkedIn who have cool resources about AI and Education. I’ll include them below in case anyone wants to check them out!!
- Yong Zhao — Author and Professor at the University of Kansas
- Adam Garry — Leader in AI Literacy
- Marcus Blair — Teacher in SD67, passionate about AI implementation in schools
My suggestions
One suggestion that I have going forward would be for Evelyn to include more specific information about where in the readings she found the themes and conclusions that she mentioned. I have read the articles she mentioned before, so I know what they discuss, but for someone who hasn’t read them, it might be helpful to include a page number that they could go to.
Overall, I loved reading Evelyn’s post! I think she shared her ideas very clearly and put thought into her reflections for the week. I think she did a great job of incorporating the course readings and sharing a new resource! I also appreciate her willingness to be vulnerable and share what she wants to work on going forward as a future teacher.
Great work, Evelyn! I look forward to reading more of your work in the future.
— Sofia
What are the specific risks and opportunities AI introduces for digital citizenship within Canadian education? What role does media literacy education play in empowering learners to critically assess AI-generated content, misinformation, and extremist narratives online?
Because AI is a technology, it fits into necessary media literacy skills for students. The risk of encountering AI for young kids is that they may not know what is true and what is false, which may lead them to be misinformed. The presence of AI is only going to grow, so I think it will be very important to teach young students how to critically assess media that they encounter. If kids can interact responsibly with AI, they can use it more effectively and can recognize when it’s useful.
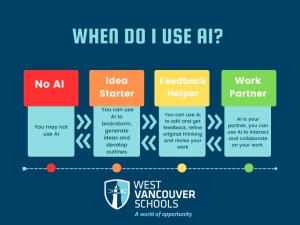
A tool, or guideline, that I have looked at in the past from School District 45 is the zones of AI use. This is a guideline that they have introduced for teachers to use with their students. It sets out four zones for AI use for schoolwork. This is a great tool for implementing the use of AI in the classroom, but also for teaching kids how to think critically about AI. I think that, particularly, the orange and yellow zones allow for good thinking about AI. When using it as an Idea starter or a feedback helper, students can create their own work and think about how the AI output could be helpful or unhelpful.
Describe an example of AI-amplified misinformation observed on Canadian social media, explain its potential impact on public opinion, and link your reflection to one of the resources above. Propose and justify a media literacy curriculum segment that teaches learners/employees to assess AI-driven social media content critically.
One example that I encountered was of AI-generated images of wildfires here in B.C. (Kulkarni, 2025). These AI-generated images have been shared on social media, which can create a dangerous situation if someone doesn’t know they are false images. One risk shared in the news release on CBC was that if there is an actual fire going on and a person only sees an AI-generated image of it, the flames could look a lot smaller than they actually are, which would make it look less serious. That person could perceive the fire as a non-threat when in reality they could be in danger. Another risk that I thought of is that if someone sees an AI-generated image of a fire when there isn’t one, they may be at risk if they try to evacuate the area unsafely. In general, I think AI-generated misinformation can lead to the over- or underestimation of safety issues. Now that social media is more widely used, authorities like a local fire department may use it to spread notices more widely. AI-generated misinformation can lessen the public’s trust in these authorities with important information to share.
The new AI for All release gives me some hope that in the future we can have better training about AI, how to use it, and reflect critically on it. The release proposes that AI is a growing sector and that Canadians need to learn to use it to develop digital citizenship, all while inviting economic growth and creating new jobs for Canadians (Government of Canada, 2026). What interests me the most is the resources that will be available for the classroom. The release mentions a new National AI Literacy Initiative that will “train more than 3,000 educators with AI learning kits in their classrooms”. I am very curious to see what that will look like and what the AI learning kits will be composed of. Hopefully, this will support learning in the classroom about how to be critical of AI and how to recognize AI misinformation.
The curriculum segment that I would propose is an age-appropriate lesson on what misinformation can look like on social platforms that students may be using. This would depend on the age of the students. For example, for a younger age, they could be shown examples from YouTube and other websites they may encounter online. The examples would then be followed by a discussion about why misinformation can be dangerous. The session could end with exploring social platforms to look for misinformation and some suggestions of tips for how to critically reflect on AI-generated content. This activity/session is justified by the B.C. Curriculum, which calls for critical and reflective thinking for every grade as part of the Core Competency of Thinking. More specifically, the facets of Analyzing and Critiquing, Questioning and Investigating, and Reflecting and Assessing (British Columbia Ministry of Education, 2026). These facets call for students to gather evidence, make judgements about works, positions, and processes, and reflect on and assess their learning. This competency applies to all grades, K-12, and onwards. Questioning and assessing different forms of media is an important part of media literacy and will continue to be as the presence of AI grows.
Is personal data being collected without an explicit educational purpose? Are third-party analytics compliant with Canadian privacy standards? Do students have meaningful control over their own information?
Before beginning to answer this question, I wanted to familiarize myself with what PIPEDA actually is: it is a document that outlines how private sector organizations can collect and use information, mainly related to commercial activity (Office of the Privacy Commissioner of Canada, 2024). My understanding is that schools and private sector organizations in provinces with similar legislation to PIPEDA do not fall under PIPEDA (Office of the Privacy Commissioner of Canada, 2015). That being said, there are still privacy guidelines in place to protect the rights of students. In BC, there is a Personal Information Protection Act that regulates the collection and disclosure of information by private education authorities and a Freedom of Information and Protection of Privacy Act that does the same for public bodies (Government of British Columbia, 2025). Therefore, although schools do not fall under PIPEDA, the privacy rights of students are still protected. PIPEDA limits data collection, but it is allowed under the condition that the collection is lawful, consensual, and accurate (Office of the Privacy Commissioner of Canada, 2025). The organization must also disclose the reason for collecting data before or at the time of collection. So, your personal data may be collected but in order for it to be legal it must still comply with PIPEDA’s fair information principles.
— Sofia
British Columbia Ministry of Education. (2026). Critical Thinking and Reflective Thinking. BC’s Curriculum. https://curriculum.gov.bc.ca/competencies/thinking/critical-and-reflective-thinking
Government of British Coumbia. (2025). Personal information protection act. Gov.bc.ca. https://www2.gov.bc.ca/gov/content/education-training/k-12/administration/program-management/independent-schools/other-legislation-regulations/personal-information-protection-act
Government of Canada. (2026, June 4). Prime minister carney launches AI for all: Canada’s new national artificial intelligence strategy. Prime Minister of Canada. https://www.pm.gc.ca/en/news/news-releases/2026/06/04/prime-minister-carney-launches-ai-all-canadas-new-national-artificial
Kennedy, C. (2024, October 2). The Stages of GenAI Adoption in Schools. The Culture of Yes. https://cultureofyes.ca/2024/10/02/the-stages-of-genai-adoption-in-schools/
Kulkarni, A. (2025, August 6). AI-generated wildfire images spreading misinformation in B.C., fire officials warn. CBC News. https://www.cbc.ca/news/canada/british-columbia/bc-wildfire-service-ai-misinformation-1.7602041
Office of the Privacy Commissioner of Canada. (2015). The application of PIPEDA to municipalities, universities, schools, and hospitals. The Personal Information Protection and Electronic Documents Act (PIPEDA). https://www.priv.gc.ca/en/privacy-topics/privacy-laws-in-canada/the-personal-information-protection-and-electronic-documents-act-pipeda/r_o_p/02_05_d_25/
Office of the Privacy Commissioner of Canada. (2024). PIPEDA requirements in brief. The Personal Information Protection and Electronic Documents Act (PIPEDA). https://www.priv.gc.ca/en/privacy-topics/privacy-laws-in-canada/the-personal-information-protection-and-electronic-documents-act-pipeda/pipeda_brief/
Office of the Privacy Commissioner of Canada. (2025). PIPEDA fair information principles. The Personal Information Protection and Electronic Documents Act (PIPEDA). https://www.priv.gc.ca/en/privacy-topics/privacy-laws-in-canada/the-personal-information-protection-and-electronic-documents-act-pipeda/p_principle/
Do you continue with your current content and your network?
Since starting the course, I have more or less continued with my normal online activities and content consumption. However, I have been thinking a lot more about how I can engage with my personal learning network and how I can grow it. What I want to focus on the most is maintaining my connections. I use LinkedIn to connect with past classmates and professionals in my chosen field, but after that initial connection, I find that I haven’t been keeping up with what my connections are up to professionally or reaching out to them. Going forward, I want to be more intentional with my communication and make my PLN more meaningful and authentic.
How do you use your skills in professional practice?
I anticipate activating my PLN connections more as I develop professionally, but as of right now, I have been using my networking competencies in my interactions with mentor teachers when visiting their classrooms. As a part of my program, I have had the opportunity to visit several classrooms to observe and to deliver lessons. As a part of that, I have been able to make connections with many lovely classroom teachers. When creating a connection, they have given me valuable feedback and extended the connection by offering me support in the future if I have any questions about lesson planning or if I would like to borrow a resource from them. I really value these conversations as I develop my teaching practice because I feel like I’ve already been welcomed into a community that values sharing and collaboration. In the future, as I start teaching and have my own classroom one day, I will seek to lean on those connections to ensure the success of my students.
I have also been able to lean on my networking skills in the context of my job, working at my local community centre. I work as an assistant teacher for LEGO Robotics after-school classes and summer camps. As I navigate my summer schedule with family trips and online classes, I have had to lean on my community connections to find others who may be interested in helping out as an assistant teacher. I contacted one of my connections, who is also interested in becoming a teacher, and I will hopefully be able to connect with them on our shared interests while also sharing a relevant opportunity.
This interaction reminded me of the chapter “Empower Others” by Erik Qualman (2011). In the chapter, he explains that our connections only become valuable when we activate them. Meaning that we can create and maintain as many connections as we want, but they are only helpful when we reach out and ask for help. I will think of this as I move forward and work on activating my connections, not only creating and maintaining them.
How has my PLN developed so far? How have I been using social media platforms? Has my perspective of social media in professional and personal settings changed?
Similar to when I began this course, I use social media platforms primarily for my own entertainment but also to keep up with friends and peers. That hasn’t changed much over the past few weeks, but I have noticed that I’m paying more attention to who can see my posts and activity, as well as what I interact with on digital platforms. I have also been paying more attention to who is in my PLN and focusing on creating meaningful connections with new people that I meet, as well as my current connections.
My perspective on social media in personal settings has changed slightly. While I still have concerns about privacy and the weakening of boundaries between the offline world and the online world. The course readings and videos have reminded me of why social media can be a great thing. Mainly, what comes to mind is the TEDx Talk featuring Harry Dyer. The video reminded me that, like all generations before me, people have been concerned about emerging technologies (TEDx Talks, 1:11, 2016). However, with every new technology also comes new forms of communication that bring new ways of sharing and problem-solving. In his book Tell everyone why we share & why it matters, Alfred Hermida (2014) explains that when people use social media platforms, they aren’t “hooked” on the platform; they are “hooked on each other,” and we have a “constant need to share” (p.1). I had forgotten why social media is so great to begin with: it allows you to connect and share with your PLN, but also with people around the world.
My perspective on social media in a professional setting has largely stayed the same. I have always thought about how my digital footprint could look to employers, but I have also stayed firm in my values as a future educator working with the vulnerable sector. Although teaching and my students will no doubt be an important part of my life, I don’t think that it is the place of teachers to put their students’ information or pictures on social media.
— Sofia
Hermida, A. (2014). Tell everyone why we share & why it matters (pp. 1–8). Doubleday Canada. https://www.academia.edu/9742579/Tell_Everyone_Why_We_Share_and_Why_It_Matters
Qualman, E. (2011). Empower others. In Digital Leader: 5 Simple Keys to Success & Influence (pp. 229–242). McGraw Hill. https://tinyurl.com/2afvzd7b
TEDx Talks. (2016). Incorporating & accounting for Social Media in Education | Harry Dyer | TEDxNorwichED. On YouTube. https://www.youtube.com/watch?v=ZteEZbAtsNI
How do PLNs and AI influence equity, accessibility, and professional growth?
Creating and maintaining a PLN gives the opportunity for anyone to create a platform to share their thoughts, opinions and perspectives. As I mentioned in a previous blog post, social media and digital platforms cannot truly be accessible and inclusive until there is worldwide equal access to the technology necessary to access them. A PLN can influence professional growth by creating opportunities based on connections. For example, if you are searching for work and you have a connection to someone in your field, you may be able to apply for opportunities that you otherwise wouldn’t have known about. Additionally, a PLN can inform you about new avenues and professional development opportunities relevant to your field. In the case of my field, Education, by maintaining a PLN with connections in my field, I may be made aware of events or seminars related to teaching or supplementary courses that would benefit my teaching practice.
AI can influence equity and accessibility in a classroom setting. As AI technologies continue to grow, teachers have begun using them to personalize lesson plans and create an overall more inclusive classroom environment. More specifically, AI technologies can track student progress, monitor their learning, and adjust lesson plans or teaching methods if needed (Kumari & Patra, p.28, 2026). This allows all students in a classroom to have a more welcoming learning experience, ensuring that they have access to the tools that they need to help them thrive.
In a professional context, AI can help identify strengths and weaknesses of an individual, giving them specific feedback (Tusquellas et al., p.7, 2024). It can also be used as a tool to automate routines, which allows an individual to spend more time on abstract thinking and problem-solving. The same is true in Education. Estaiteyeh and Mindzak (2025) present how teacher education students used an AI tool to create lesson plans, then analyzed how they could be improved in terms of inclusivity and accessibility for students. Many of the participating teacher candidates “emphasized how the module offered new resources for lesson planning, teaching, and assessment” (p.144). By using an AI tool to create preliminary lesson plans and assessments, teachers can then focus on more specific improvements and personalizations for their students.
How does my PLN support my professional learning goals?
As a future educator, my main professional learning goal is to develop my teaching practice to the point where I can provide a meaningful, inclusive, and engaging classroom environment to all of my students. My PLN will hopefully help me along that journey by exposing me to new perspectives and professional development opportunities. I follow a few educators on LinkedIn, and I love looking at their updates about courses they are offering and their new career updates. I find that it gets me thinking about my own career path and how I can pursue professional development opportunities that will ultimately benefit my students.
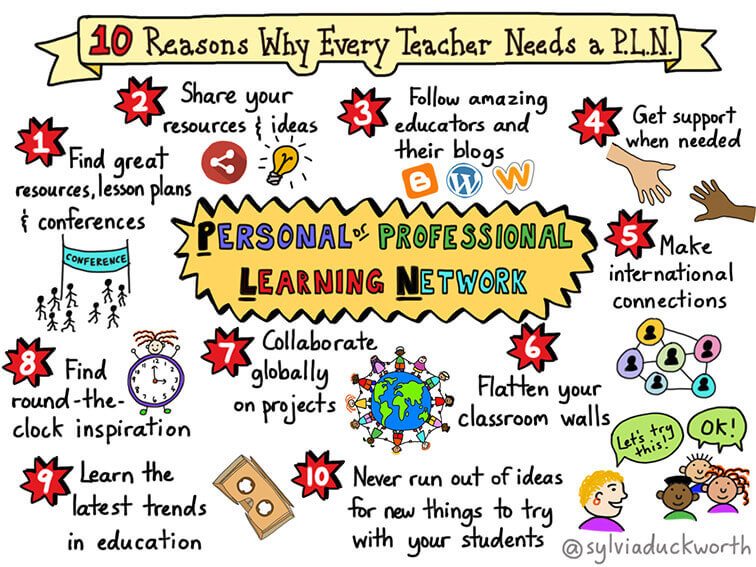
Through my search for Canadian sources that discuss PLNs in the context of Canadian education, I found the blog of an Ontario teacher, Spencer Burton. In his post (2014), he discusses the pros and cons of having a PLN and some reasons why every teacher should have a PLN.
He shared the image below, which highlights the ways that teachers can benefit professionally from a PLN. What sticks out to me is that a PLN can help keep teachers up to date with new trends in education and help keep them inspired. Something that I have seen come through in my courses this past year is that in order to deliver engaging lessons to your students, you also need to be excited about the material. By engaging with my PLN, I anticipate exploring new avenues for my lessons that are exciting for me as well as my students.
What are the strengths and weaknesses of my PLN and the inclusion of AI?
As I discussed in one of my previous blog posts, I don’t think that my PLN is diverse enough in terms of perspectives. I have a lot of connections from the same general geographic area as me, which means that they have similar thoughts and ideas. Moving forward, I would like to work on diversifying my PLN by engaging with people from different backgrounds. One highlight of my PLN is that I was able to make lots of connections through a summer program that I attended in 2023. It was a month-long STEM and entrepreneurship program that invited students from all over Canada to participate in workshops and seminars on a variety of STEAM-related topics. Through this opportunity, I made many meaningful connections with other students from various provinces who all continued on different educational paths. As a result, I have the privilege to know many accomplished and talented individuals who have had different experiences from me and who can expose me to different worldviews.
Because my PLN is comprised of many connections from where I grew up, I don’t have as many connections with fellow educators as I would like. However, I do follow some educators on LinkedIn, and I have made many wonderful connections within my program. These connections are ultimately more relevant to my professional development, as they are the connections that can inspire me in terms of new material for lesson planning and instructional methods. Something that I admire so much about the teaching profession is that Educators are so open to sharing resources and ideas. The Educators that I encounter in my PLN, online and in person, have been so welcoming and eager to share their resources, which have been very helpful to me as I develop my teaching practice and collect materials.
I found the article by Estaiteyeh and Mindzak (2025) so interesting because I am also a preservice teacher in this new age of AI technologies. I enjoyed reading the article because I saw myself in the students, and it challenged my perspective by emphasizing the importance of embracing AI. The resounding conclusion of their research was that teachers must be trained on how to use AI responsibly and ethically so that they can use it in their practice, but also so that they can educate their students on responsible use of AI (pp.148-149). As a teacher education student, I want to work on embracing this perspective. I am generally nervous about AI use in education, but moving forward, I want to embrace this perspective. I think that, like the preservice teachers from the study, if I had more training on how to effectively use AI, I would feel more comfortable using it for educational purposes. That being said, I don’t think that my PLN includes AI in a particularly meaningful or useful way. To engage in professional development in the area of AI, I hope to explore Educators who use AI and have suggestions about how it may be useful. Additionally, I hope to look into courses that I could take to ensure that I know how to use AI responsibly as an Educator.
My thoughts on Prime Minister Carney’s new national artificial intelligence strategy.
A few days ago, Prime Minister Carney released a statement about his new national artificial intelligence strategy that aims to ensure equal access to AI technology for all Canadians. What interests me is their goal to establish a New National AI Literacy Initiative. They specify that this will involve “train[ing] more than 3,000 educators with AI learning kits in their classrooms”. This relates to my thoughts above about establishing more training for preservice teachers so that they can then use AI more effectively in their classrooms. As a preservice teacher, I hope that this initiative proves to be useful and that it can help teachers feel more confident about using AI to benefit their teaching practice.
— Sofia
Burton, S. (2014). Pros and cons of professional learning networks. Spencer Burton: Learning about Learning. https://www.spencerburton.ca/pros-and-cons-of-professional-learning-networks-plns/
Estaiteyeh, M., & Mindzak, M. (2025). Building AI literacy in pre-service teacher education in Canada: A case study of two cohorts. Journal of Teaching and Learning, 19(4), 135–154. https://doi.org/10.22329/jtl.v19i4.10041
Kumari, N., & Patra, B. C. (2026). AI and inclusive education: Enhancing equity, engagement and excellence. In K. M. Soni, N. Hasteer, A. Bhardwaj, R. Sindhwani, & J. P. Davim (Eds.), AI-Based Solutions for Inclusive Quality Education (pp. 27–44). CRC Press. https://www-taylorfrancis-com.ezproxy.library.uvic.ca/reader/read-online/ff028100-00c2-4e1a-b258-0cd361809479/book/pdf?context=ubx
Prime Minister of Canada. (2026, June 4). Prime Minister Carney launches AI for all: Canada’s new national artificial intelligence strategy. Government of Canada. https://www.pm.gc.ca/en/news/news-releases/2026/06/04/prime-minister-carney-launches-ai-all-canadas-new-national-artificial
Tusquellas, N., Palau, R., & Santiago, R. (2024). Analysis of the potential of artificial intelligence for professional development and talent management: A systematic literature review. International Journal of Information Management Data Insights, 4. https://doi.org/10.1016/j.jjimei.2024.100288