Sofia's Blog

Journaling, Collage, Reflection, and Baking

Blueberry Muffins

Photo taken by Sofia Huster

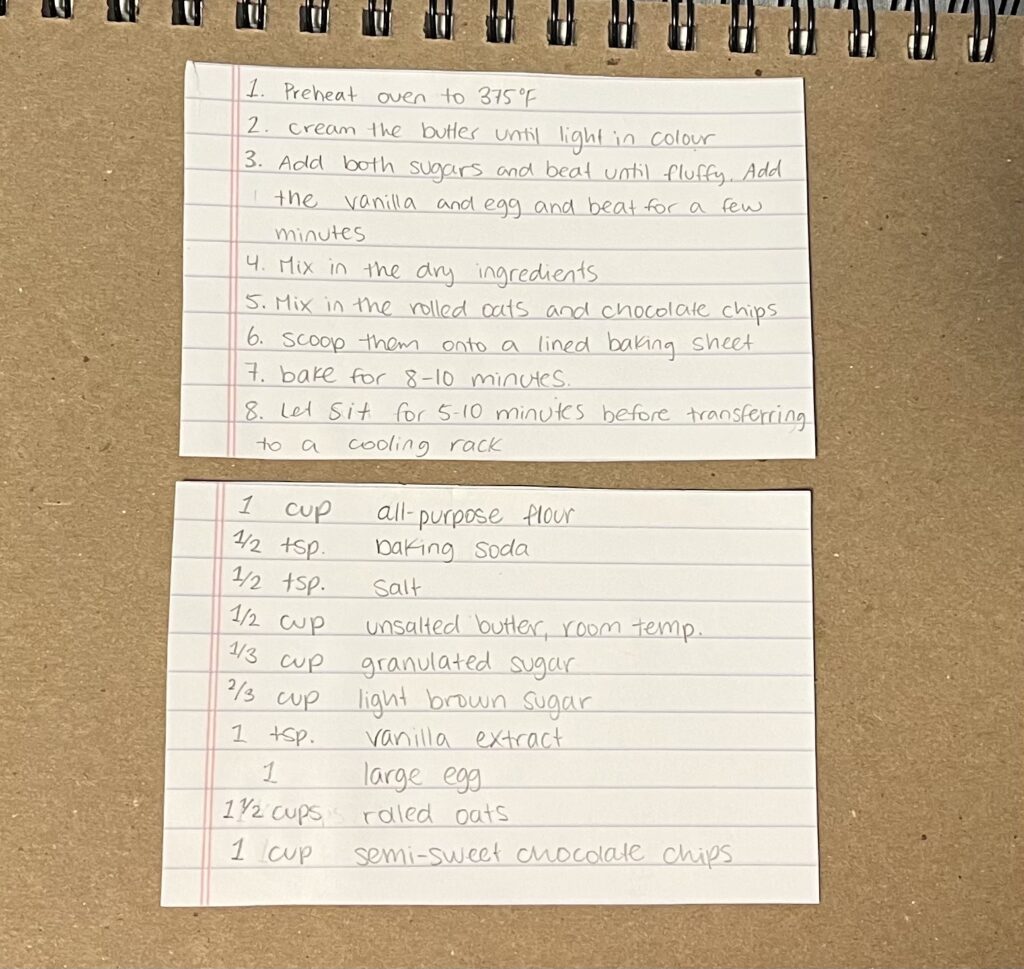
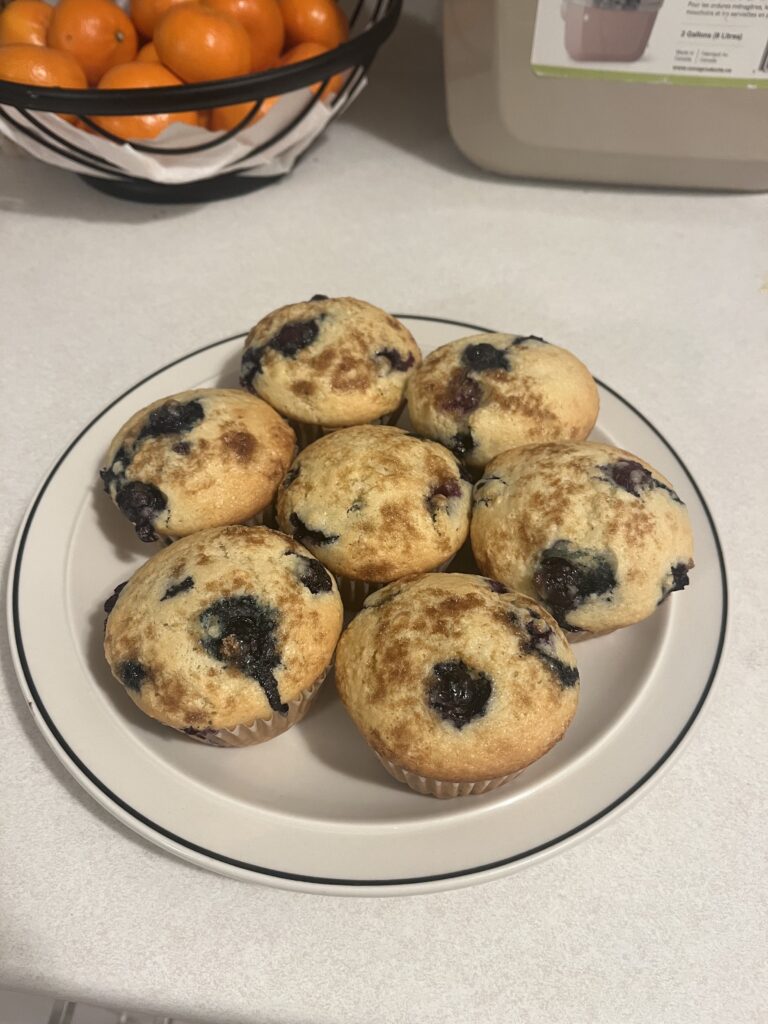
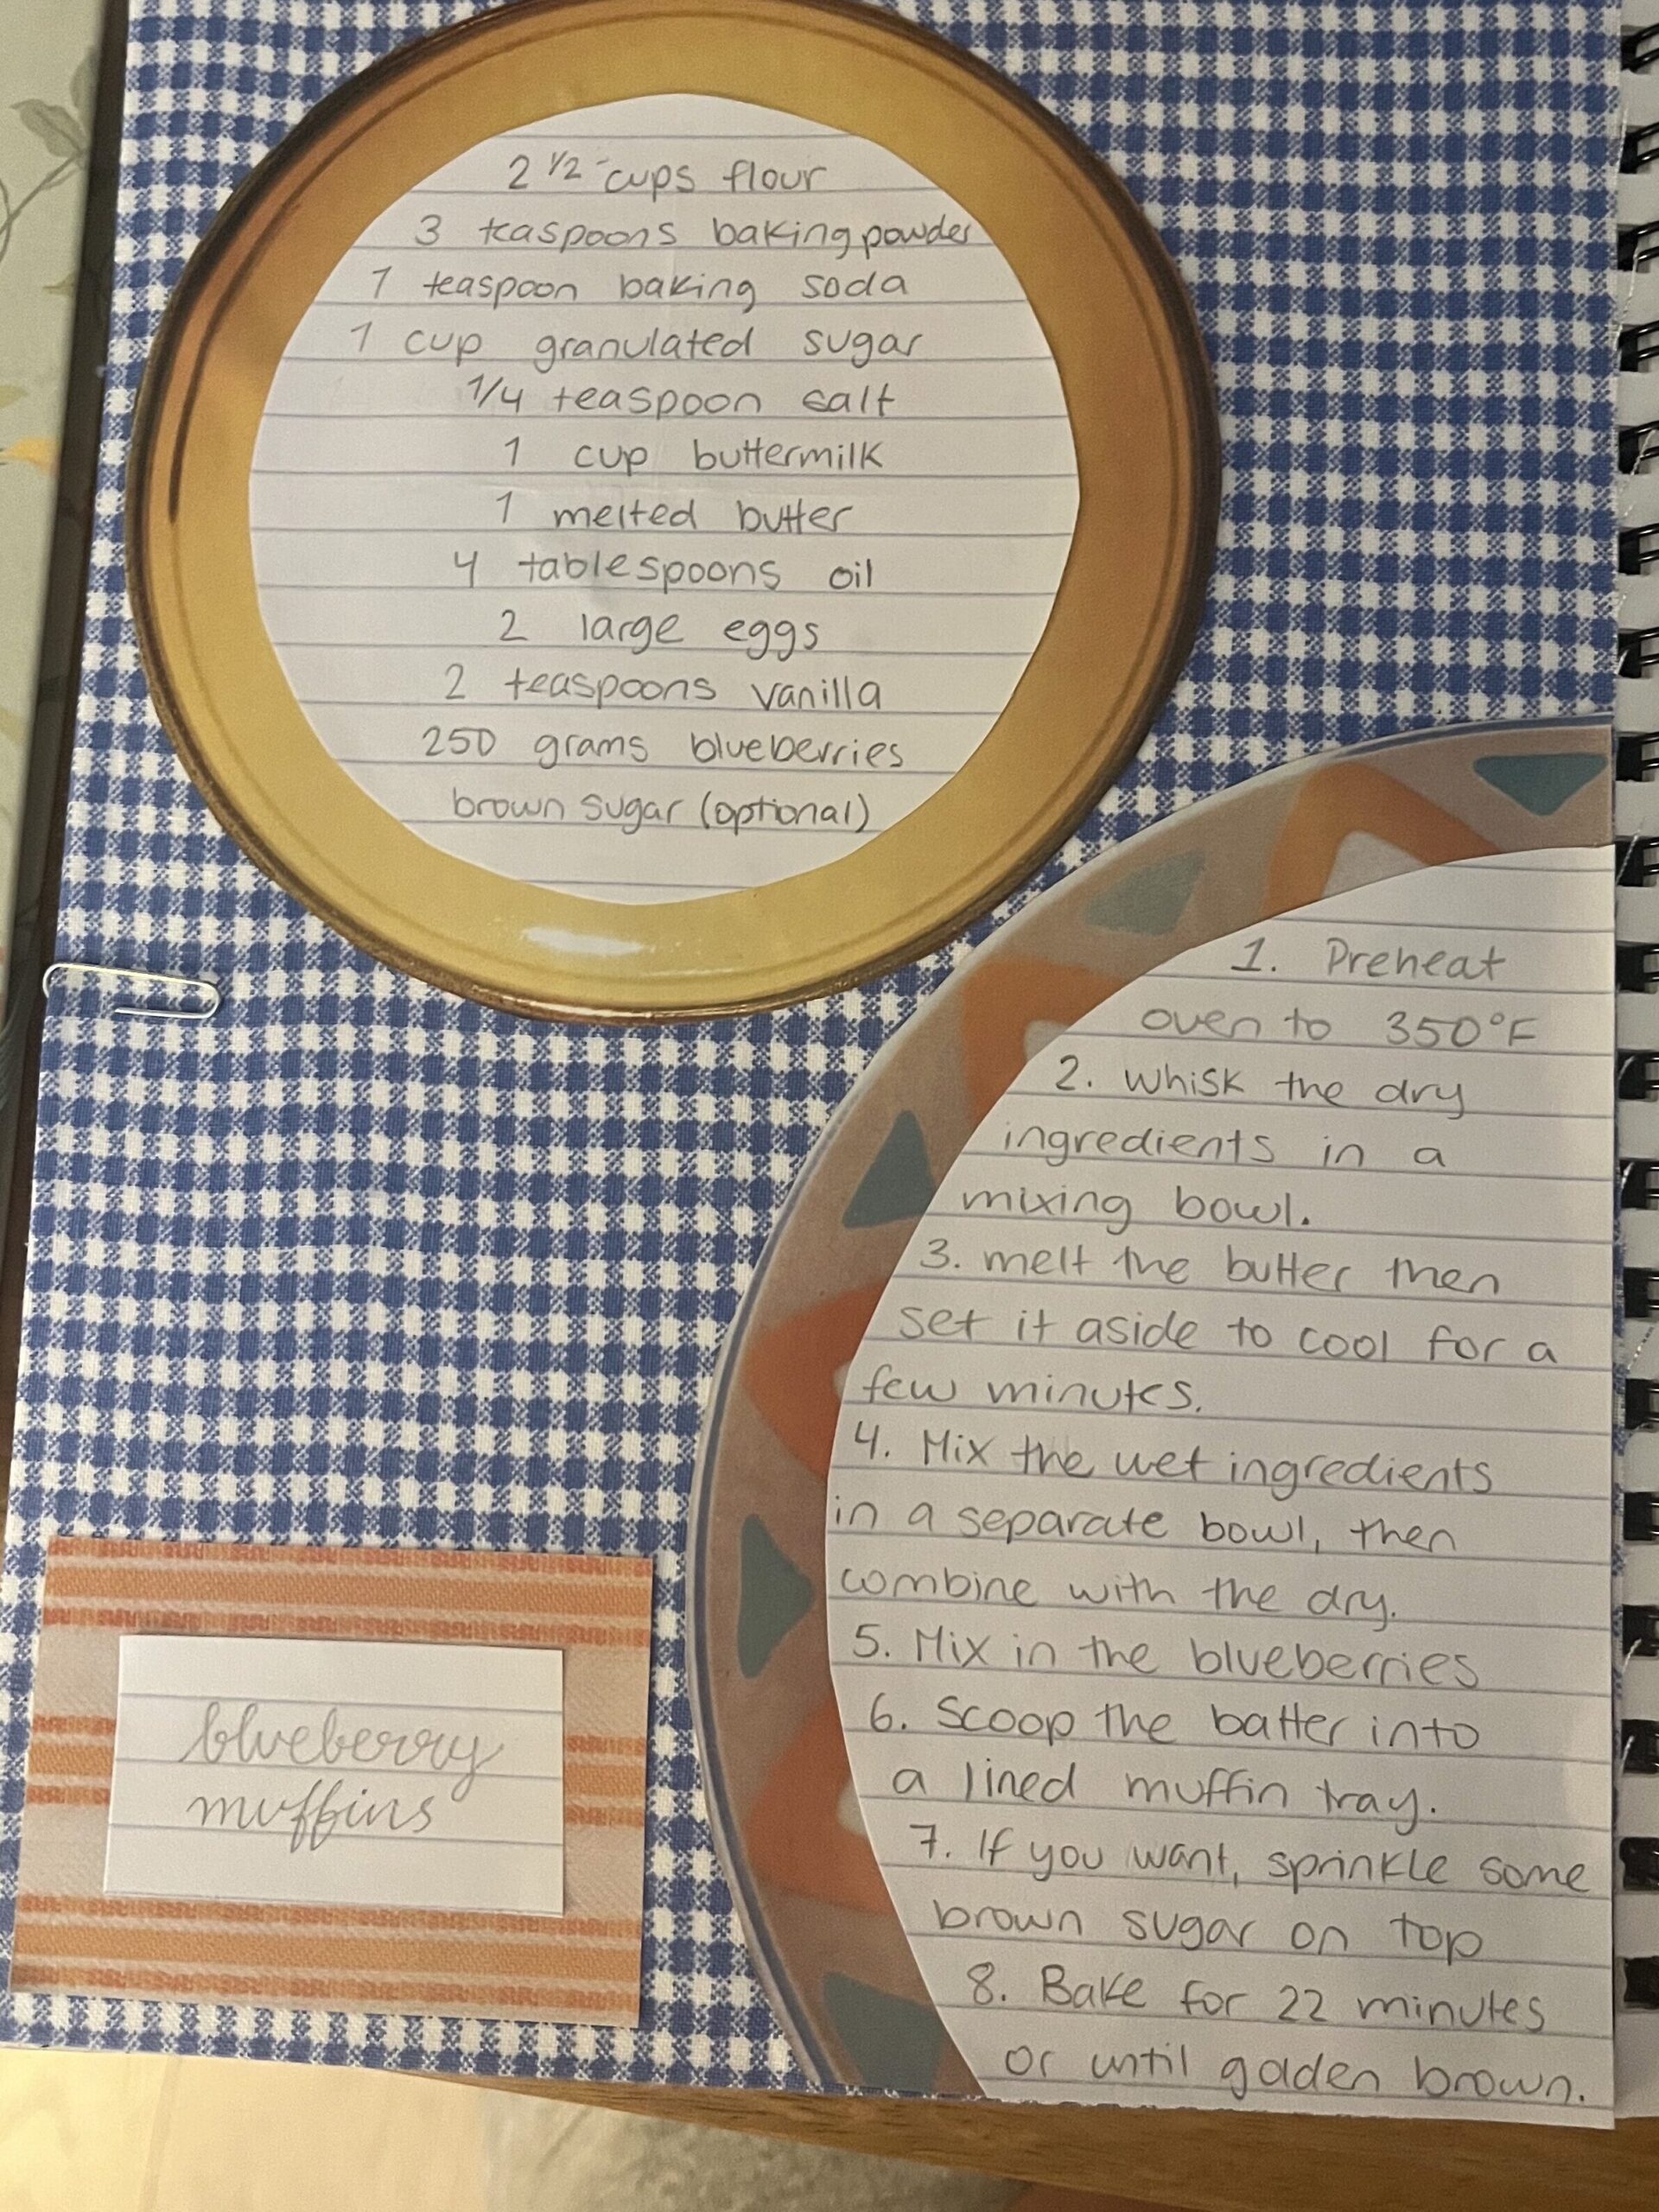
This week I worked on the page for my blueberry muffin recipe! It’s been a while since I made them, but once I took them out of the oven, I was reminded of how much I love them! They are light, fluffy, and not too sweet, with the bonus of incorporating fresh berries! After learning my lesson with the chocolate chip cookies, I made sure to pay extra attention to the labels on my measuring spoons. I also made sure to bake the muffins before writing out the instructions and ingredients to pay attention to the unwritten things I do when I bake.

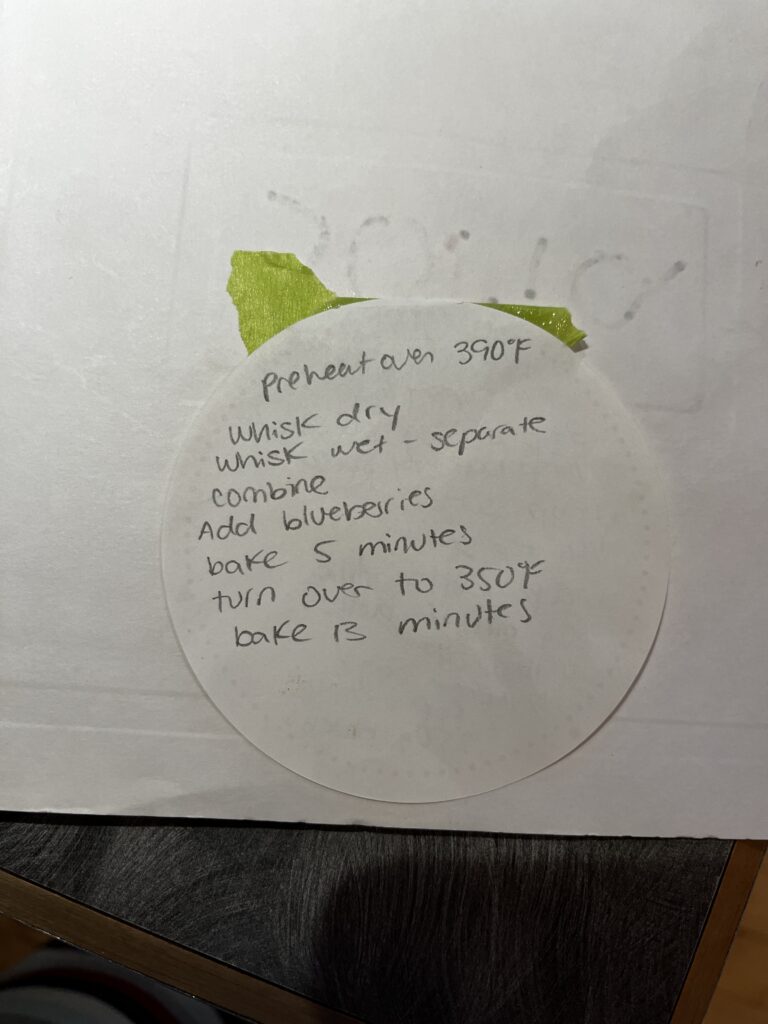
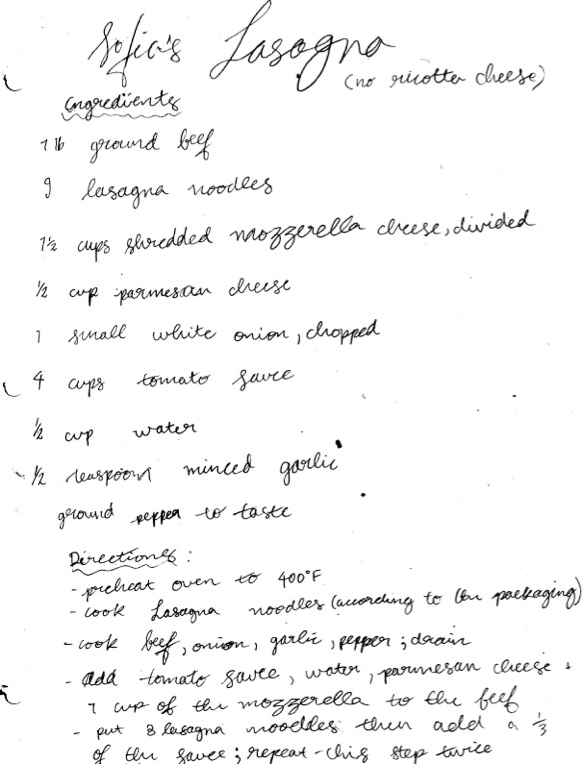
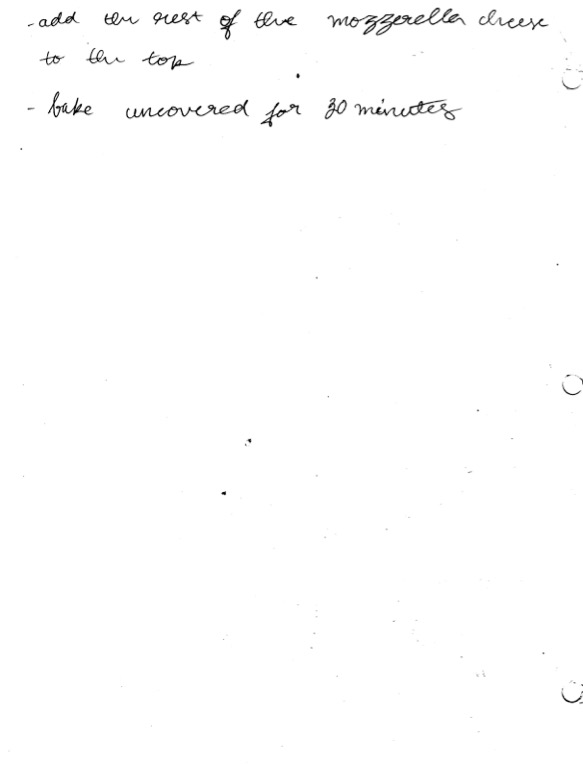
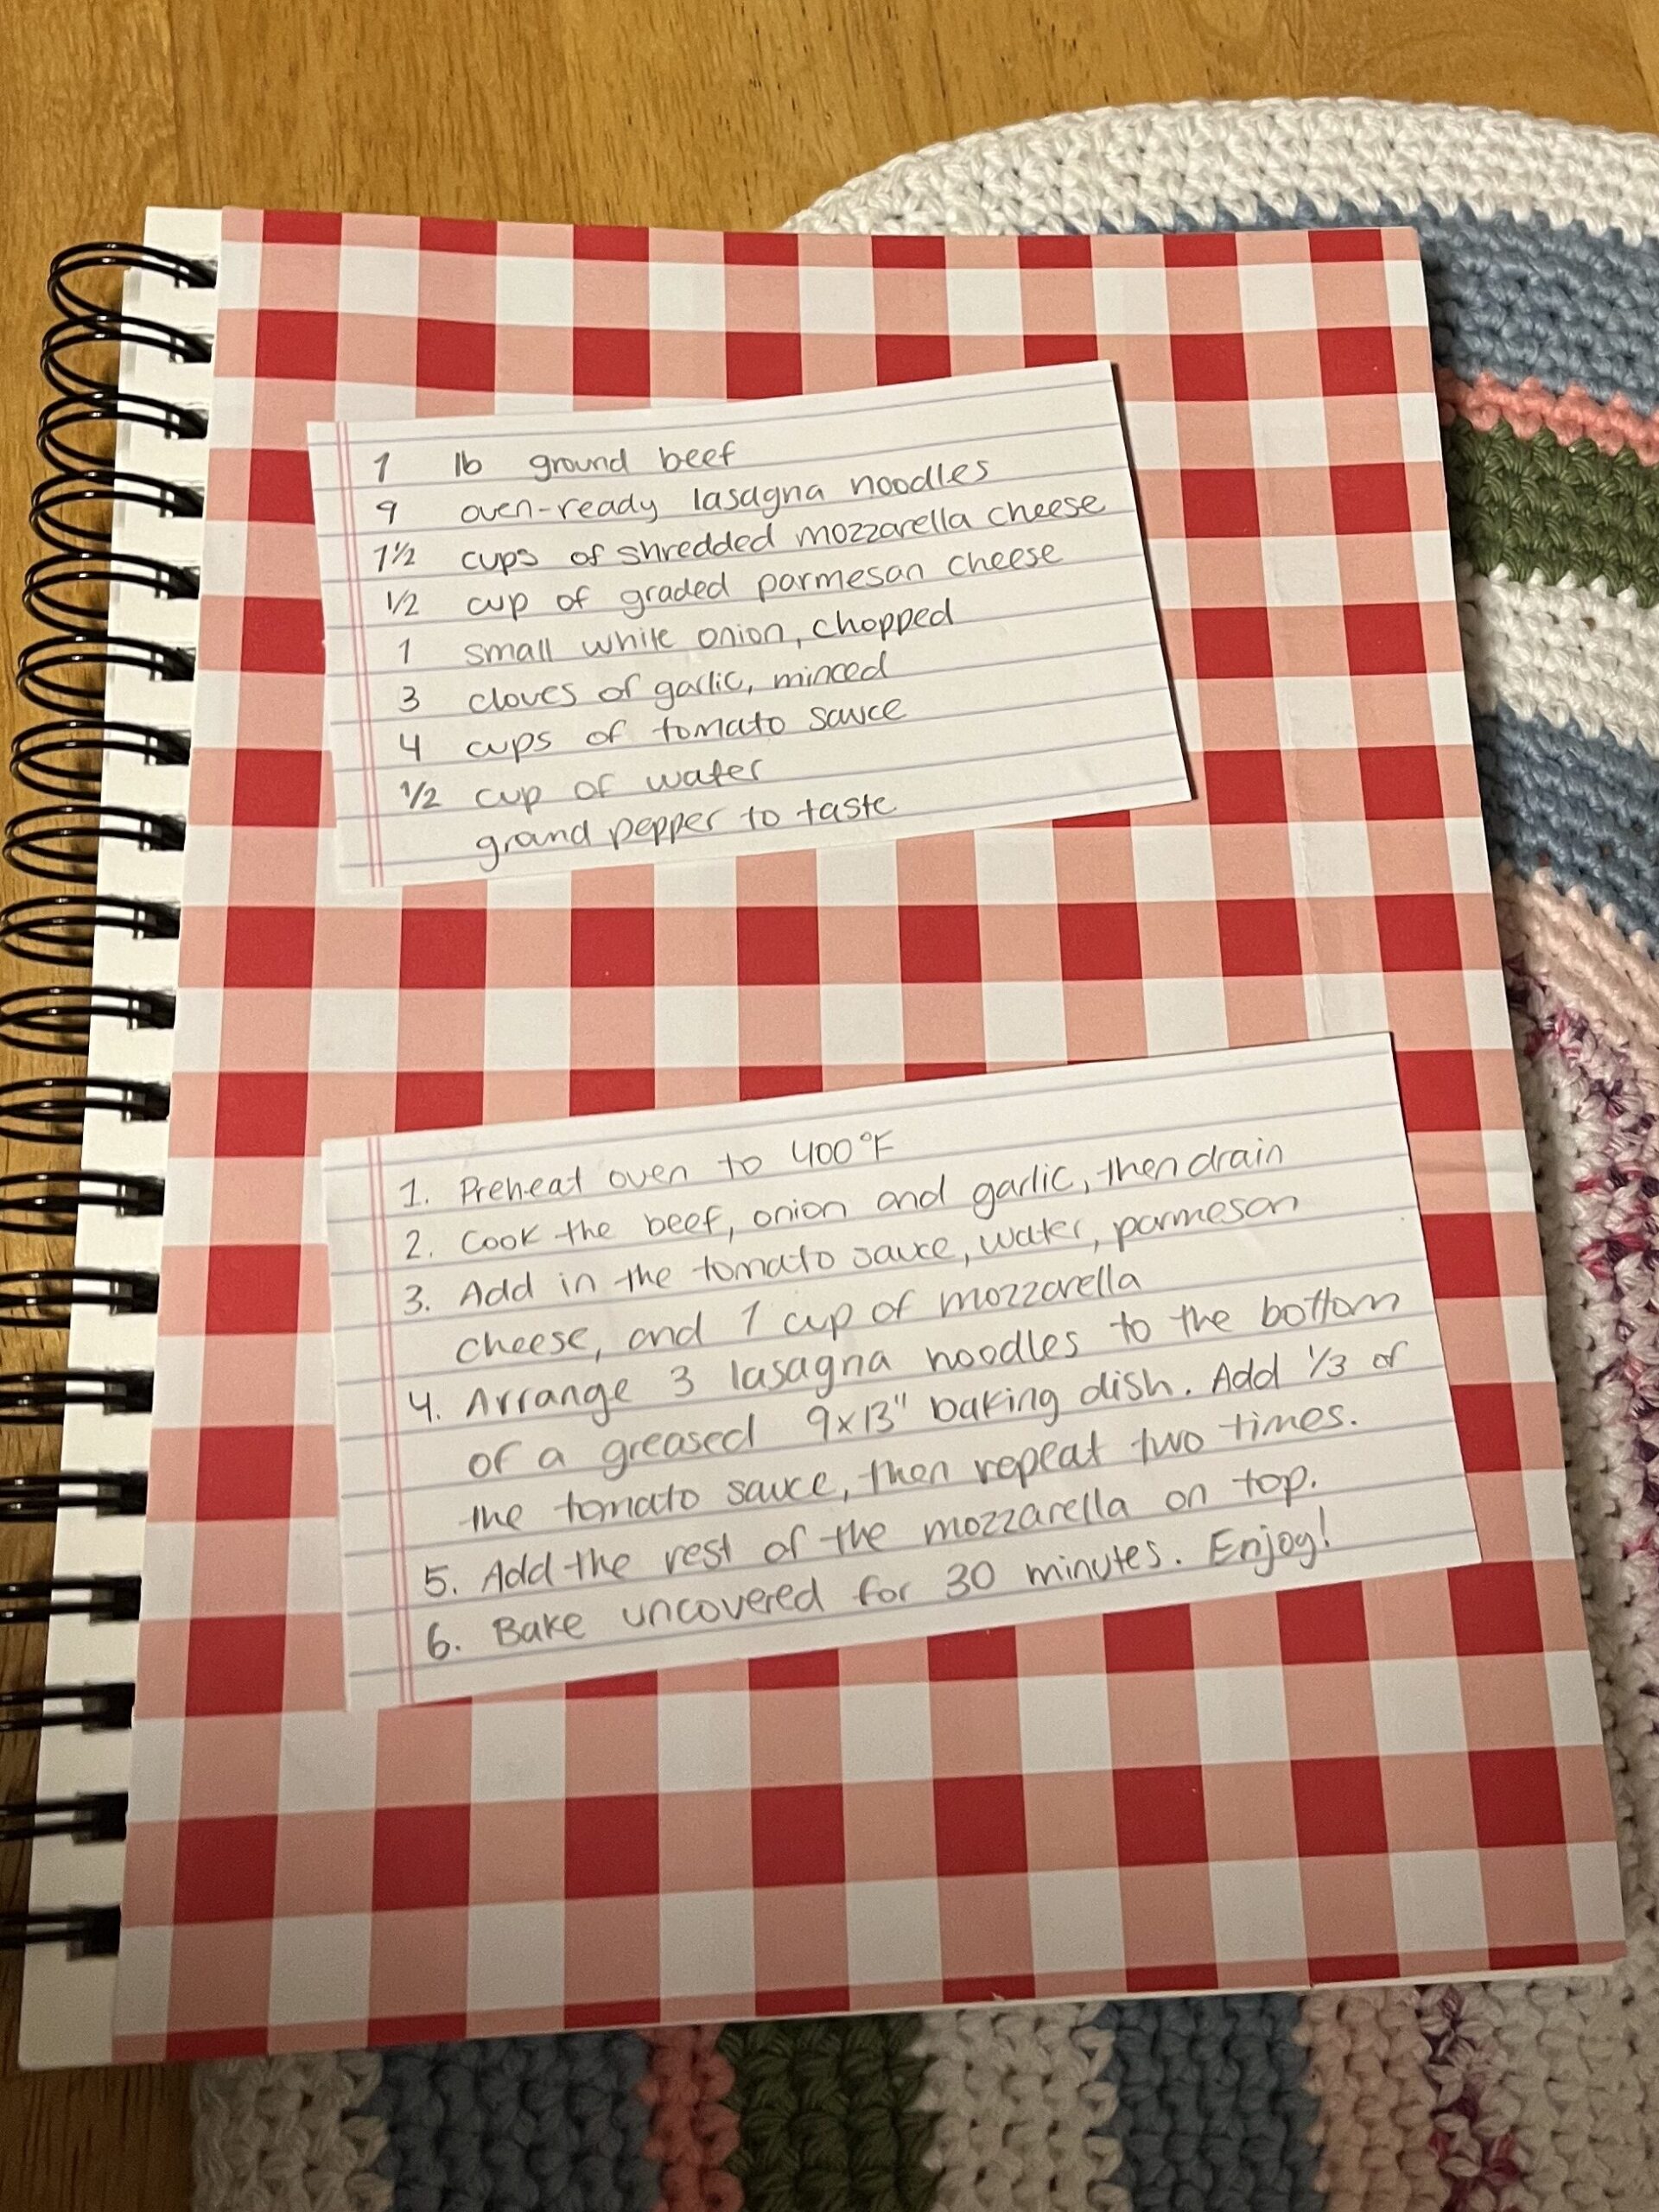
Above are some photos of my original recipe page from back home. I am really glad to be making this recipe book page because the previous state of this recipe was a little post-it note on my fridge. The instructions were also very brief, to the point where I sometimes didn’t remember what I meant. So when rewriting the recipe, I took care to elaborate a little bit more.

On the new recipe page, I did include a new ingredient, brown sugar. I specified that its optional because it really is just for decoration on the top of the muffins. I like to add a little bit on top to add to the golden brown look of the muffins, and it makes the top a little more crunchy. I also changed the baking time and instructions. The original recipe had the oven preheated to 390°F, to bake for 5 minutes, then to turn it down to 350°F for another 13 minutes. I decided to change this for simplicity. The new instructions are to preheat the oven to 350°F and to bake the muffins for 22 minutes.

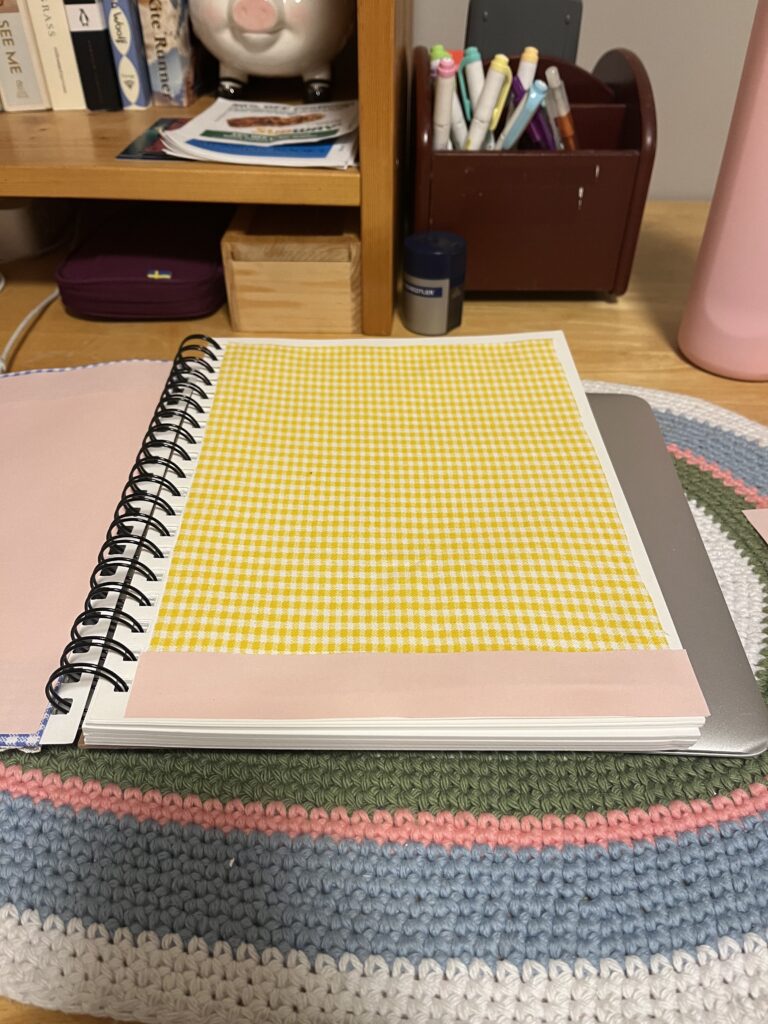
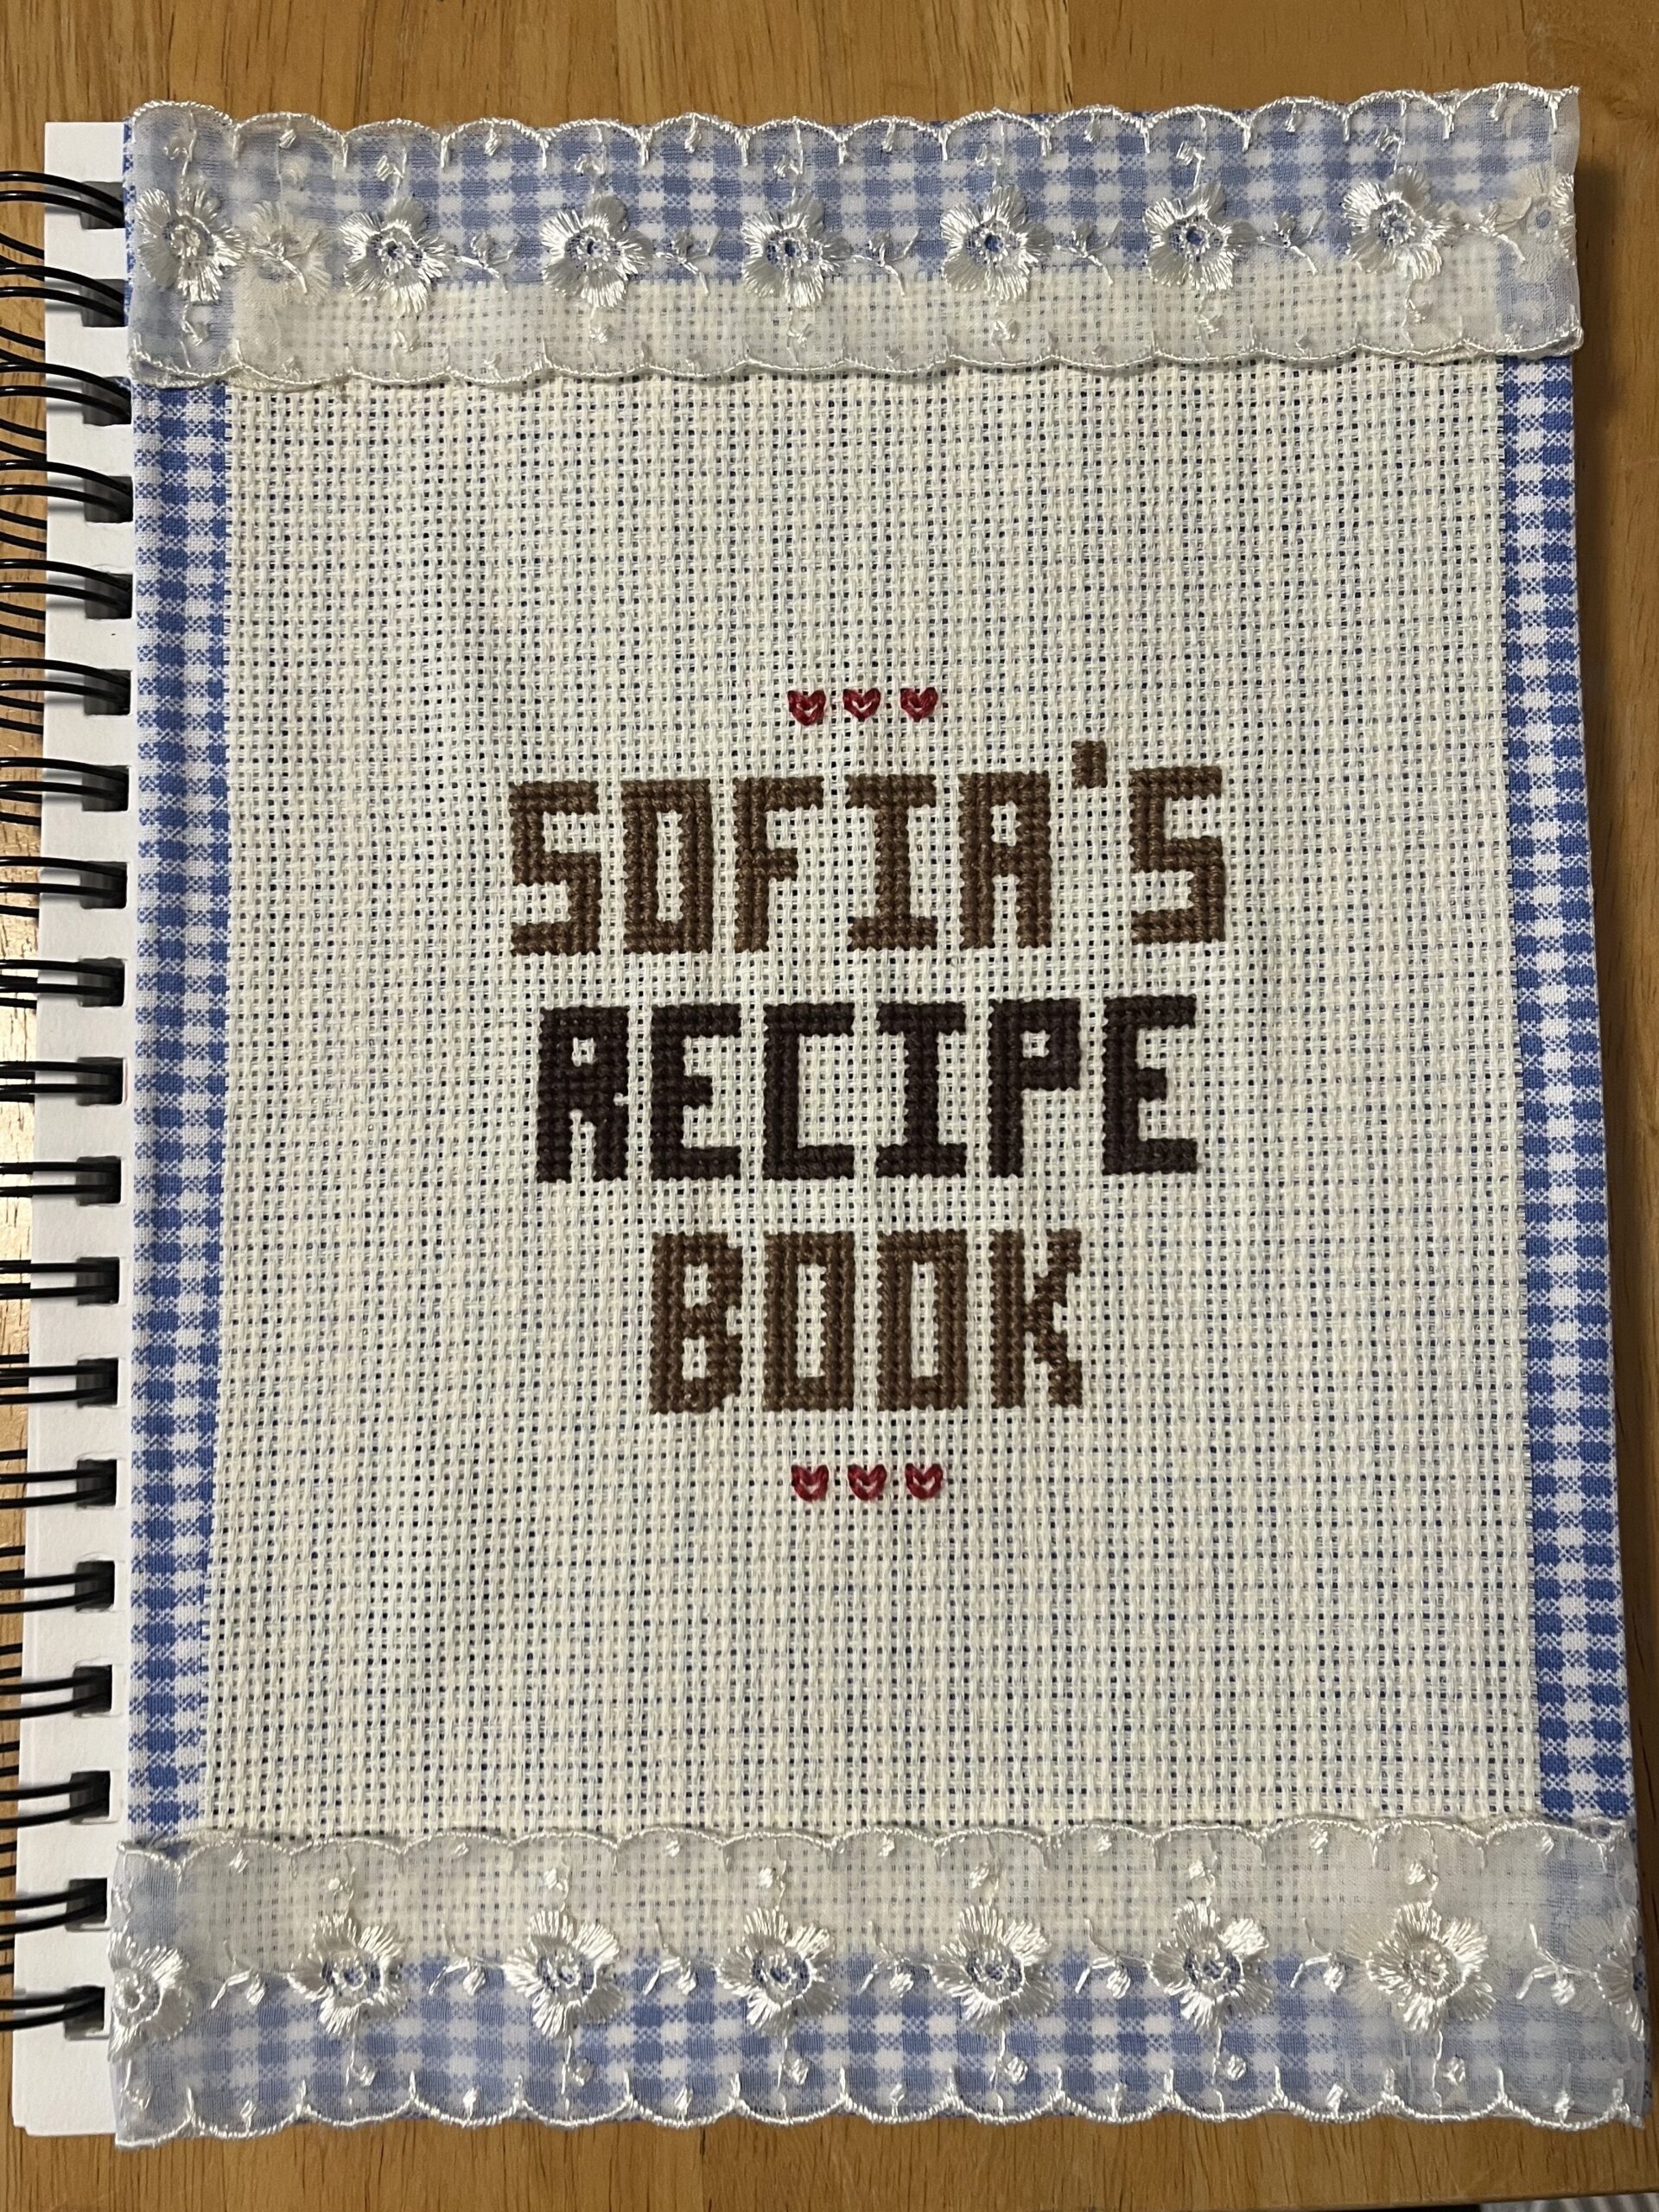
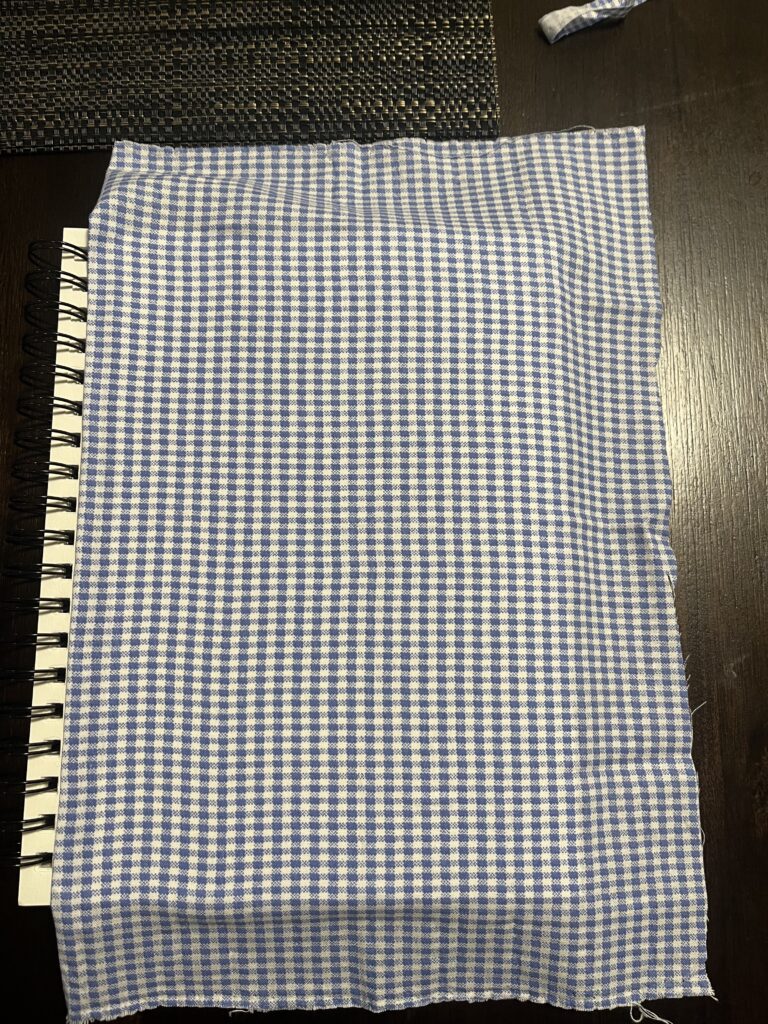
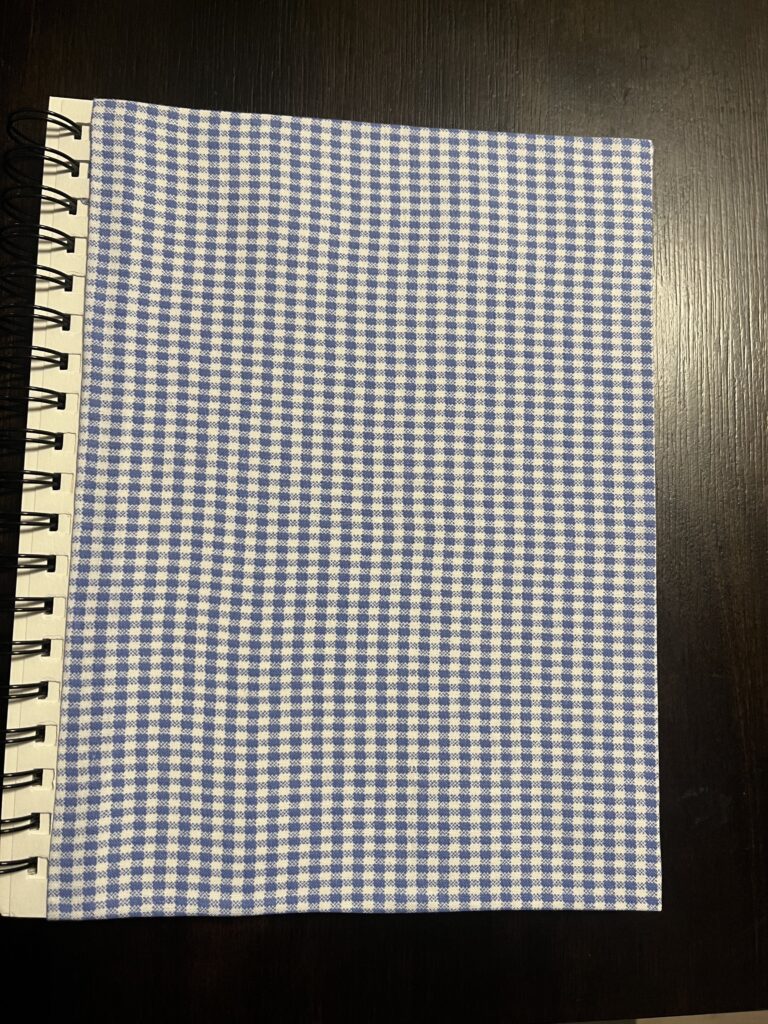
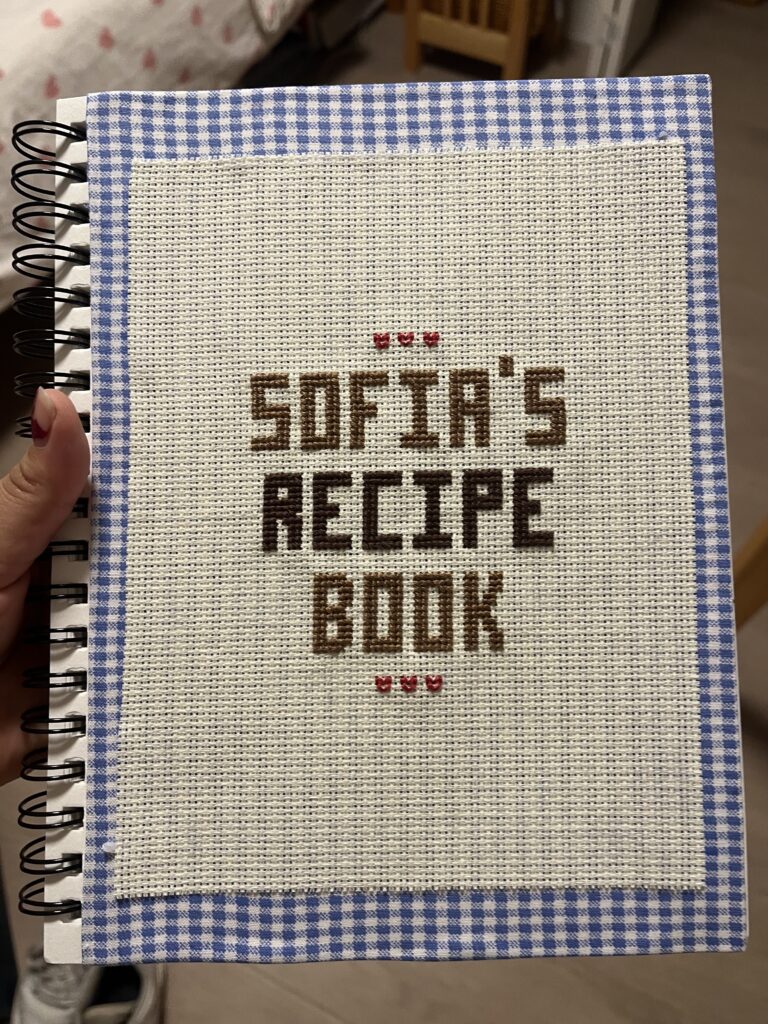
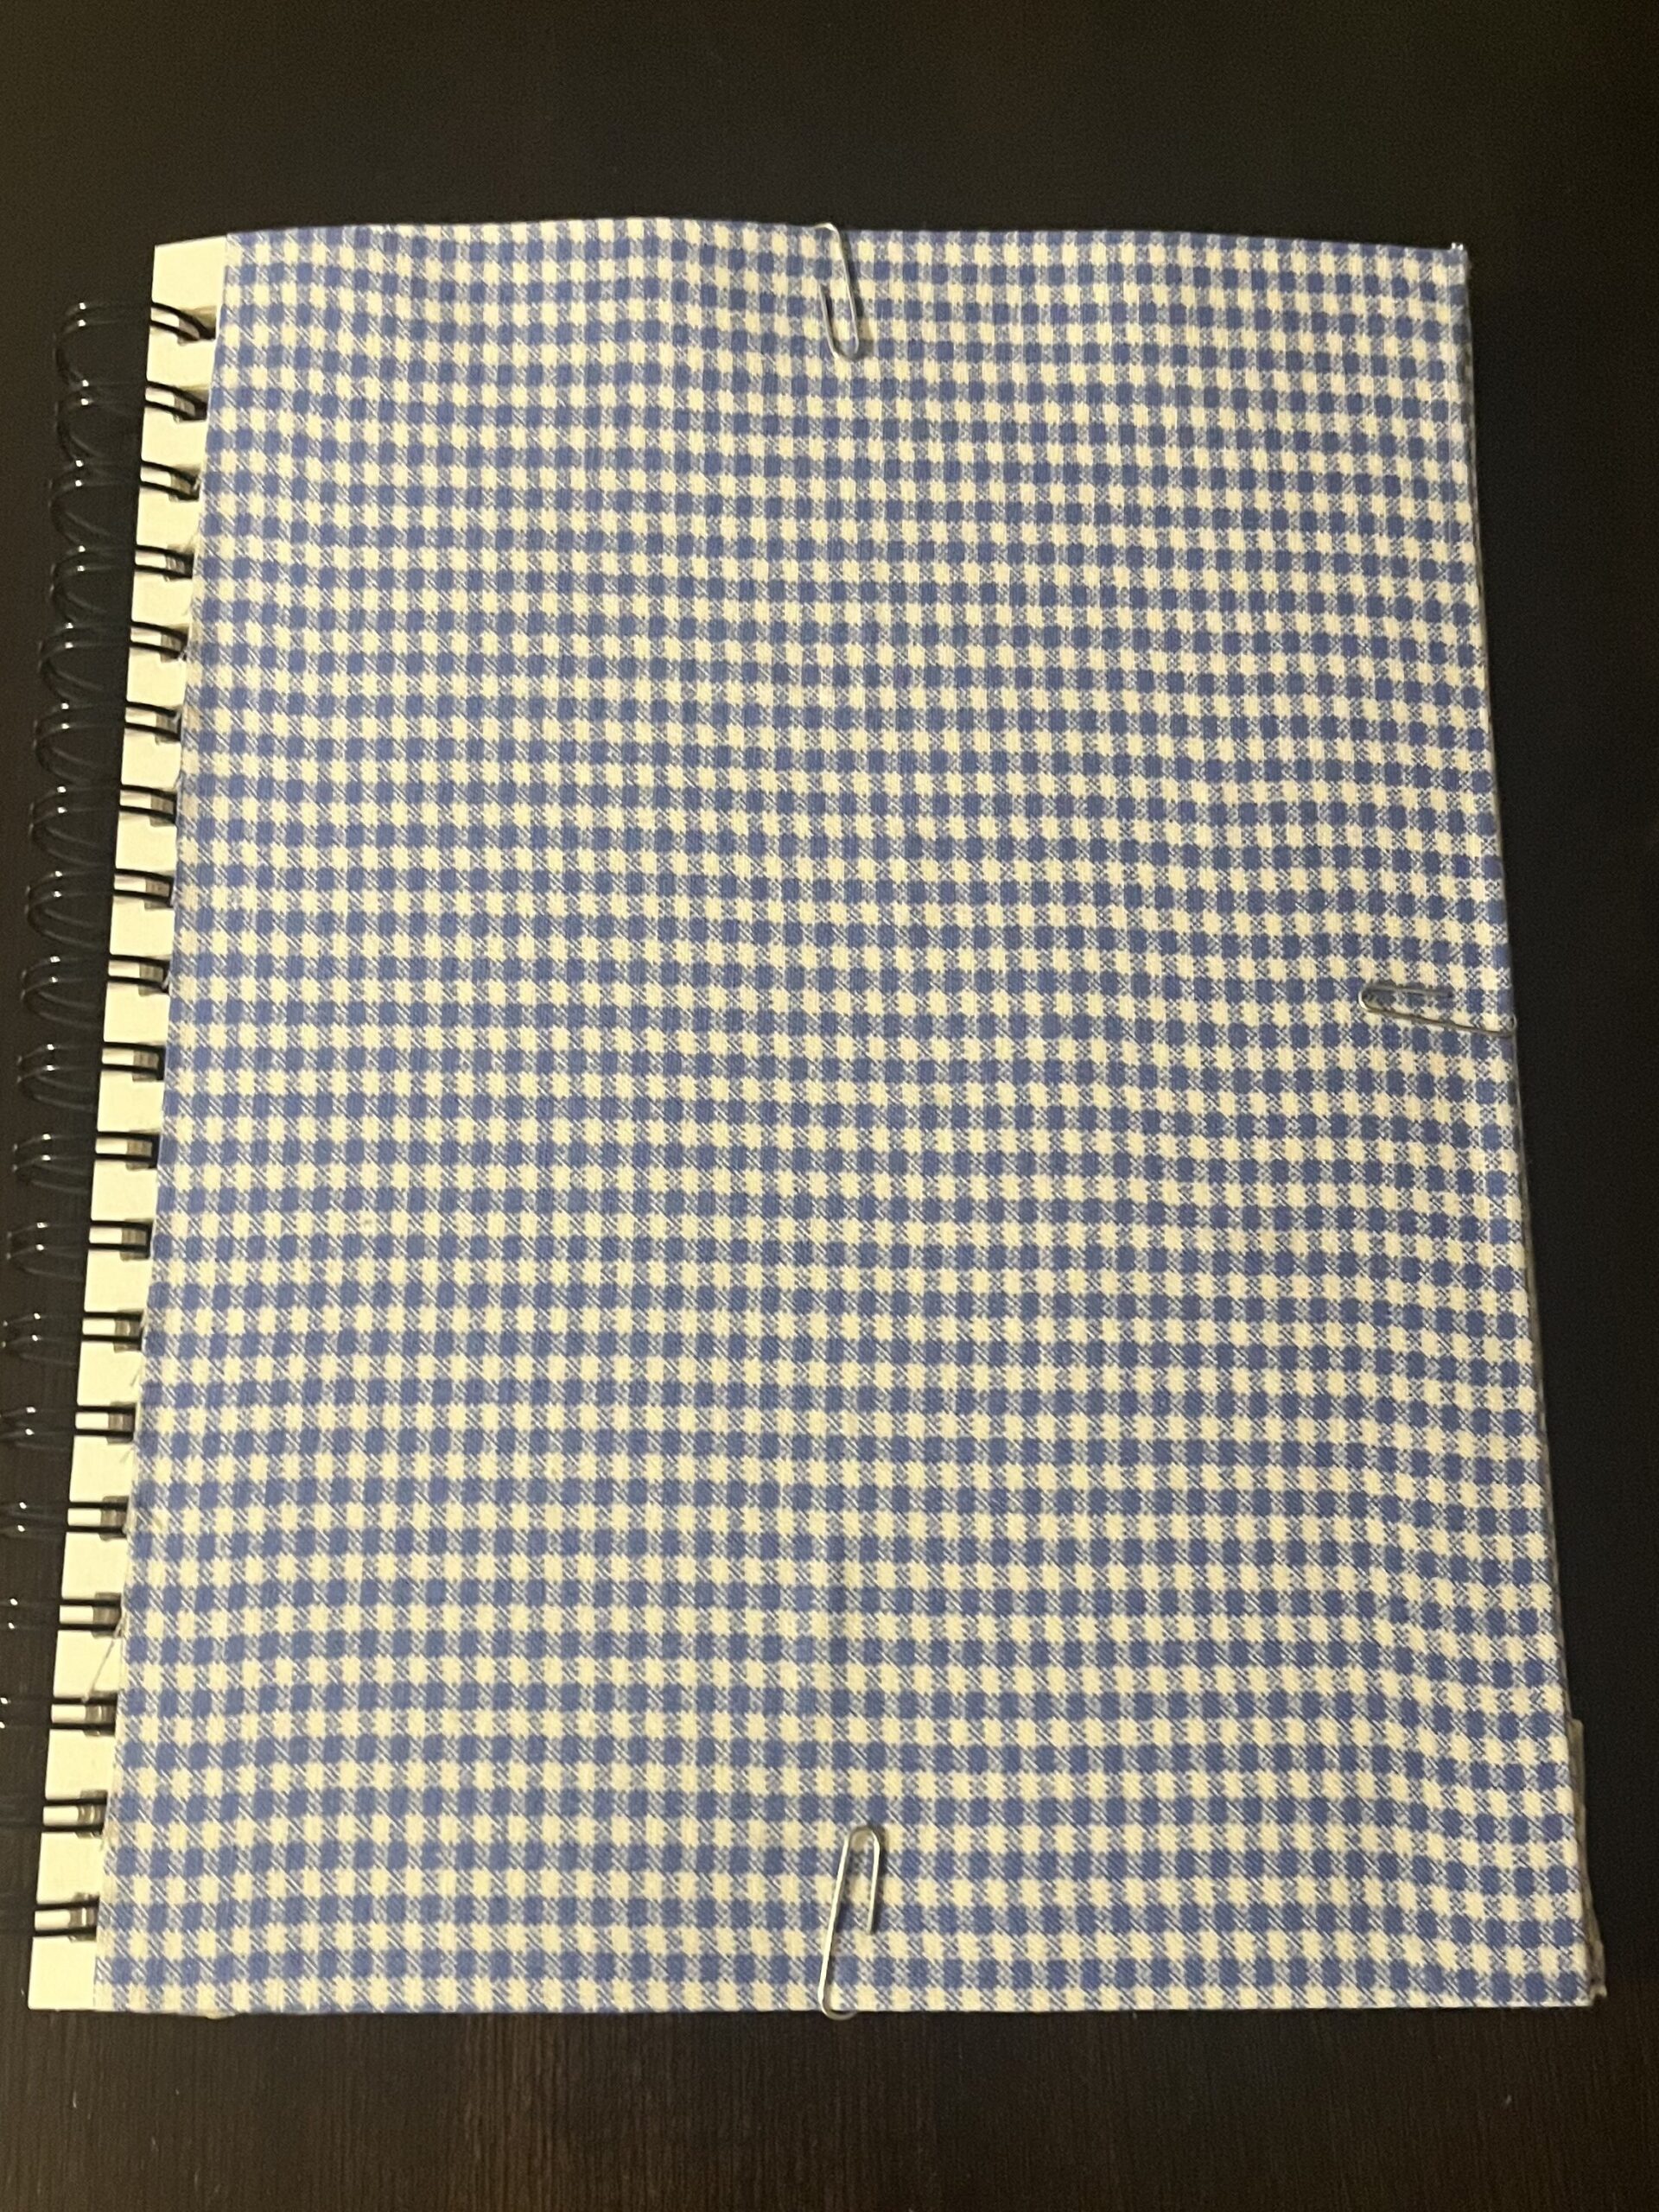
I started the page with my usual process: to pick a background material. This time I picked blue gingham, the same as for the cover page. I chose it becase I wanted something blue for blueberries. For the next parts, I wanted to try something different than for my previous pages to mix things up. When I was first preparing my materials for this project, I bought an old cookbook from the thrift store that has lots of cool culinary pictures and beautiful patterns. My new idea was to cut out some of the patterned plates from the staged pictures and write out my ingredients and instructions on them.

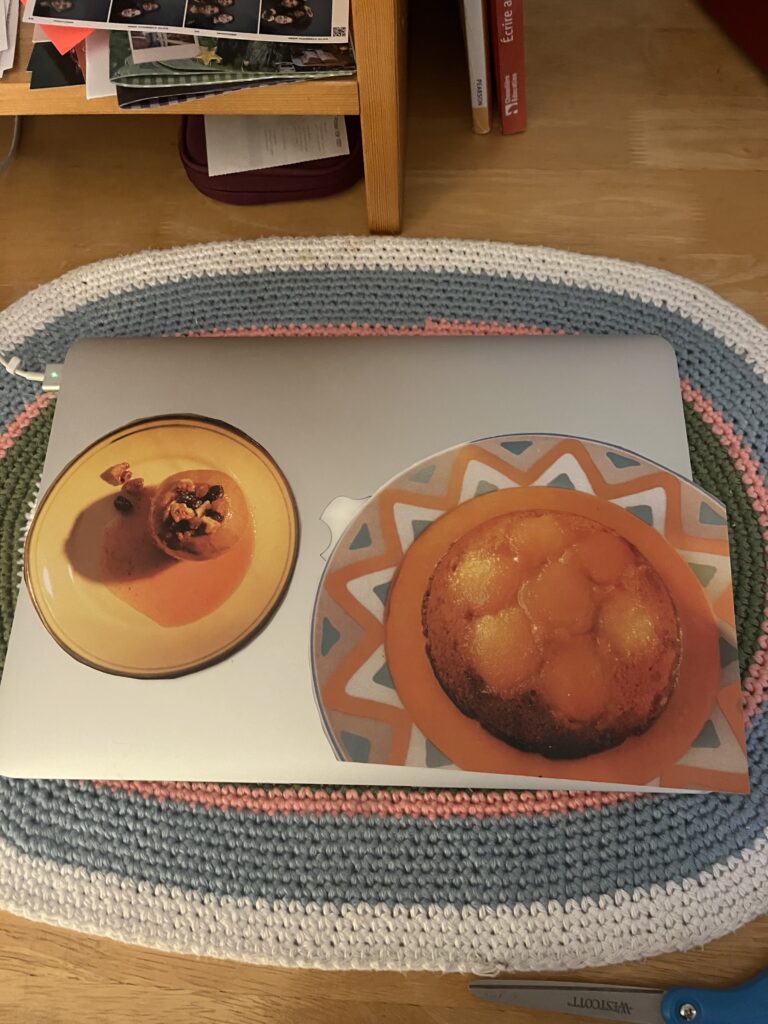
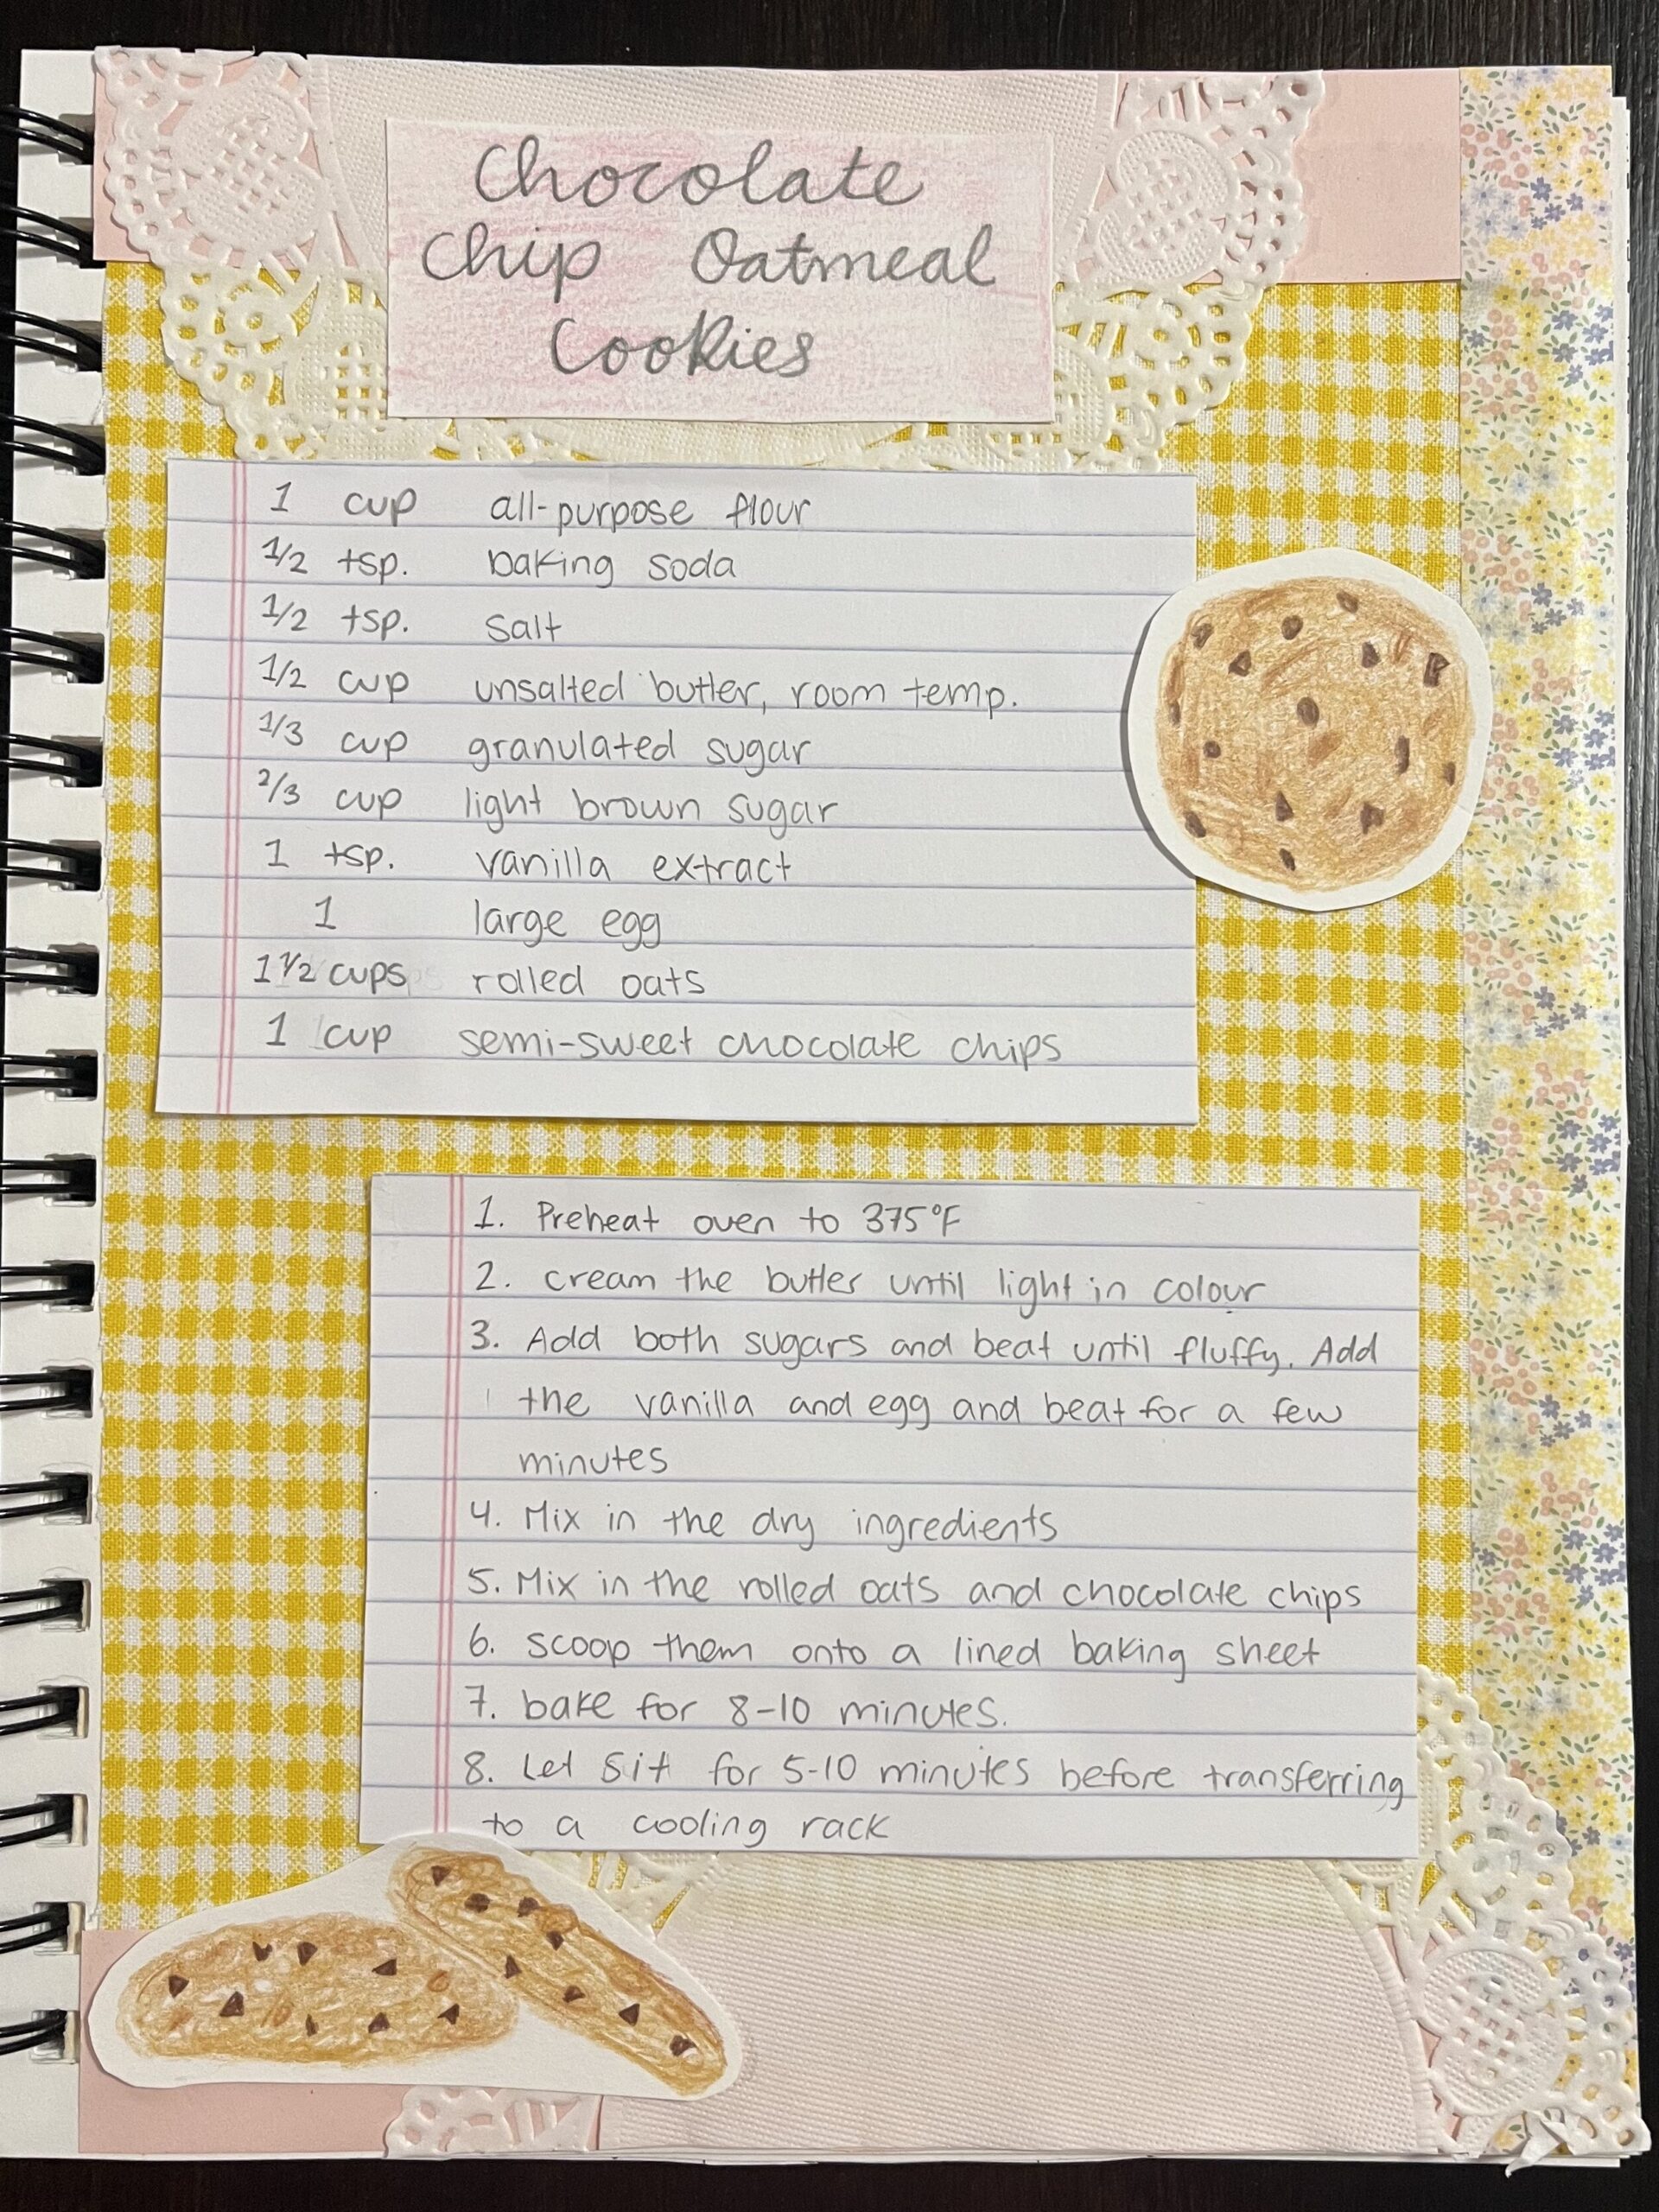
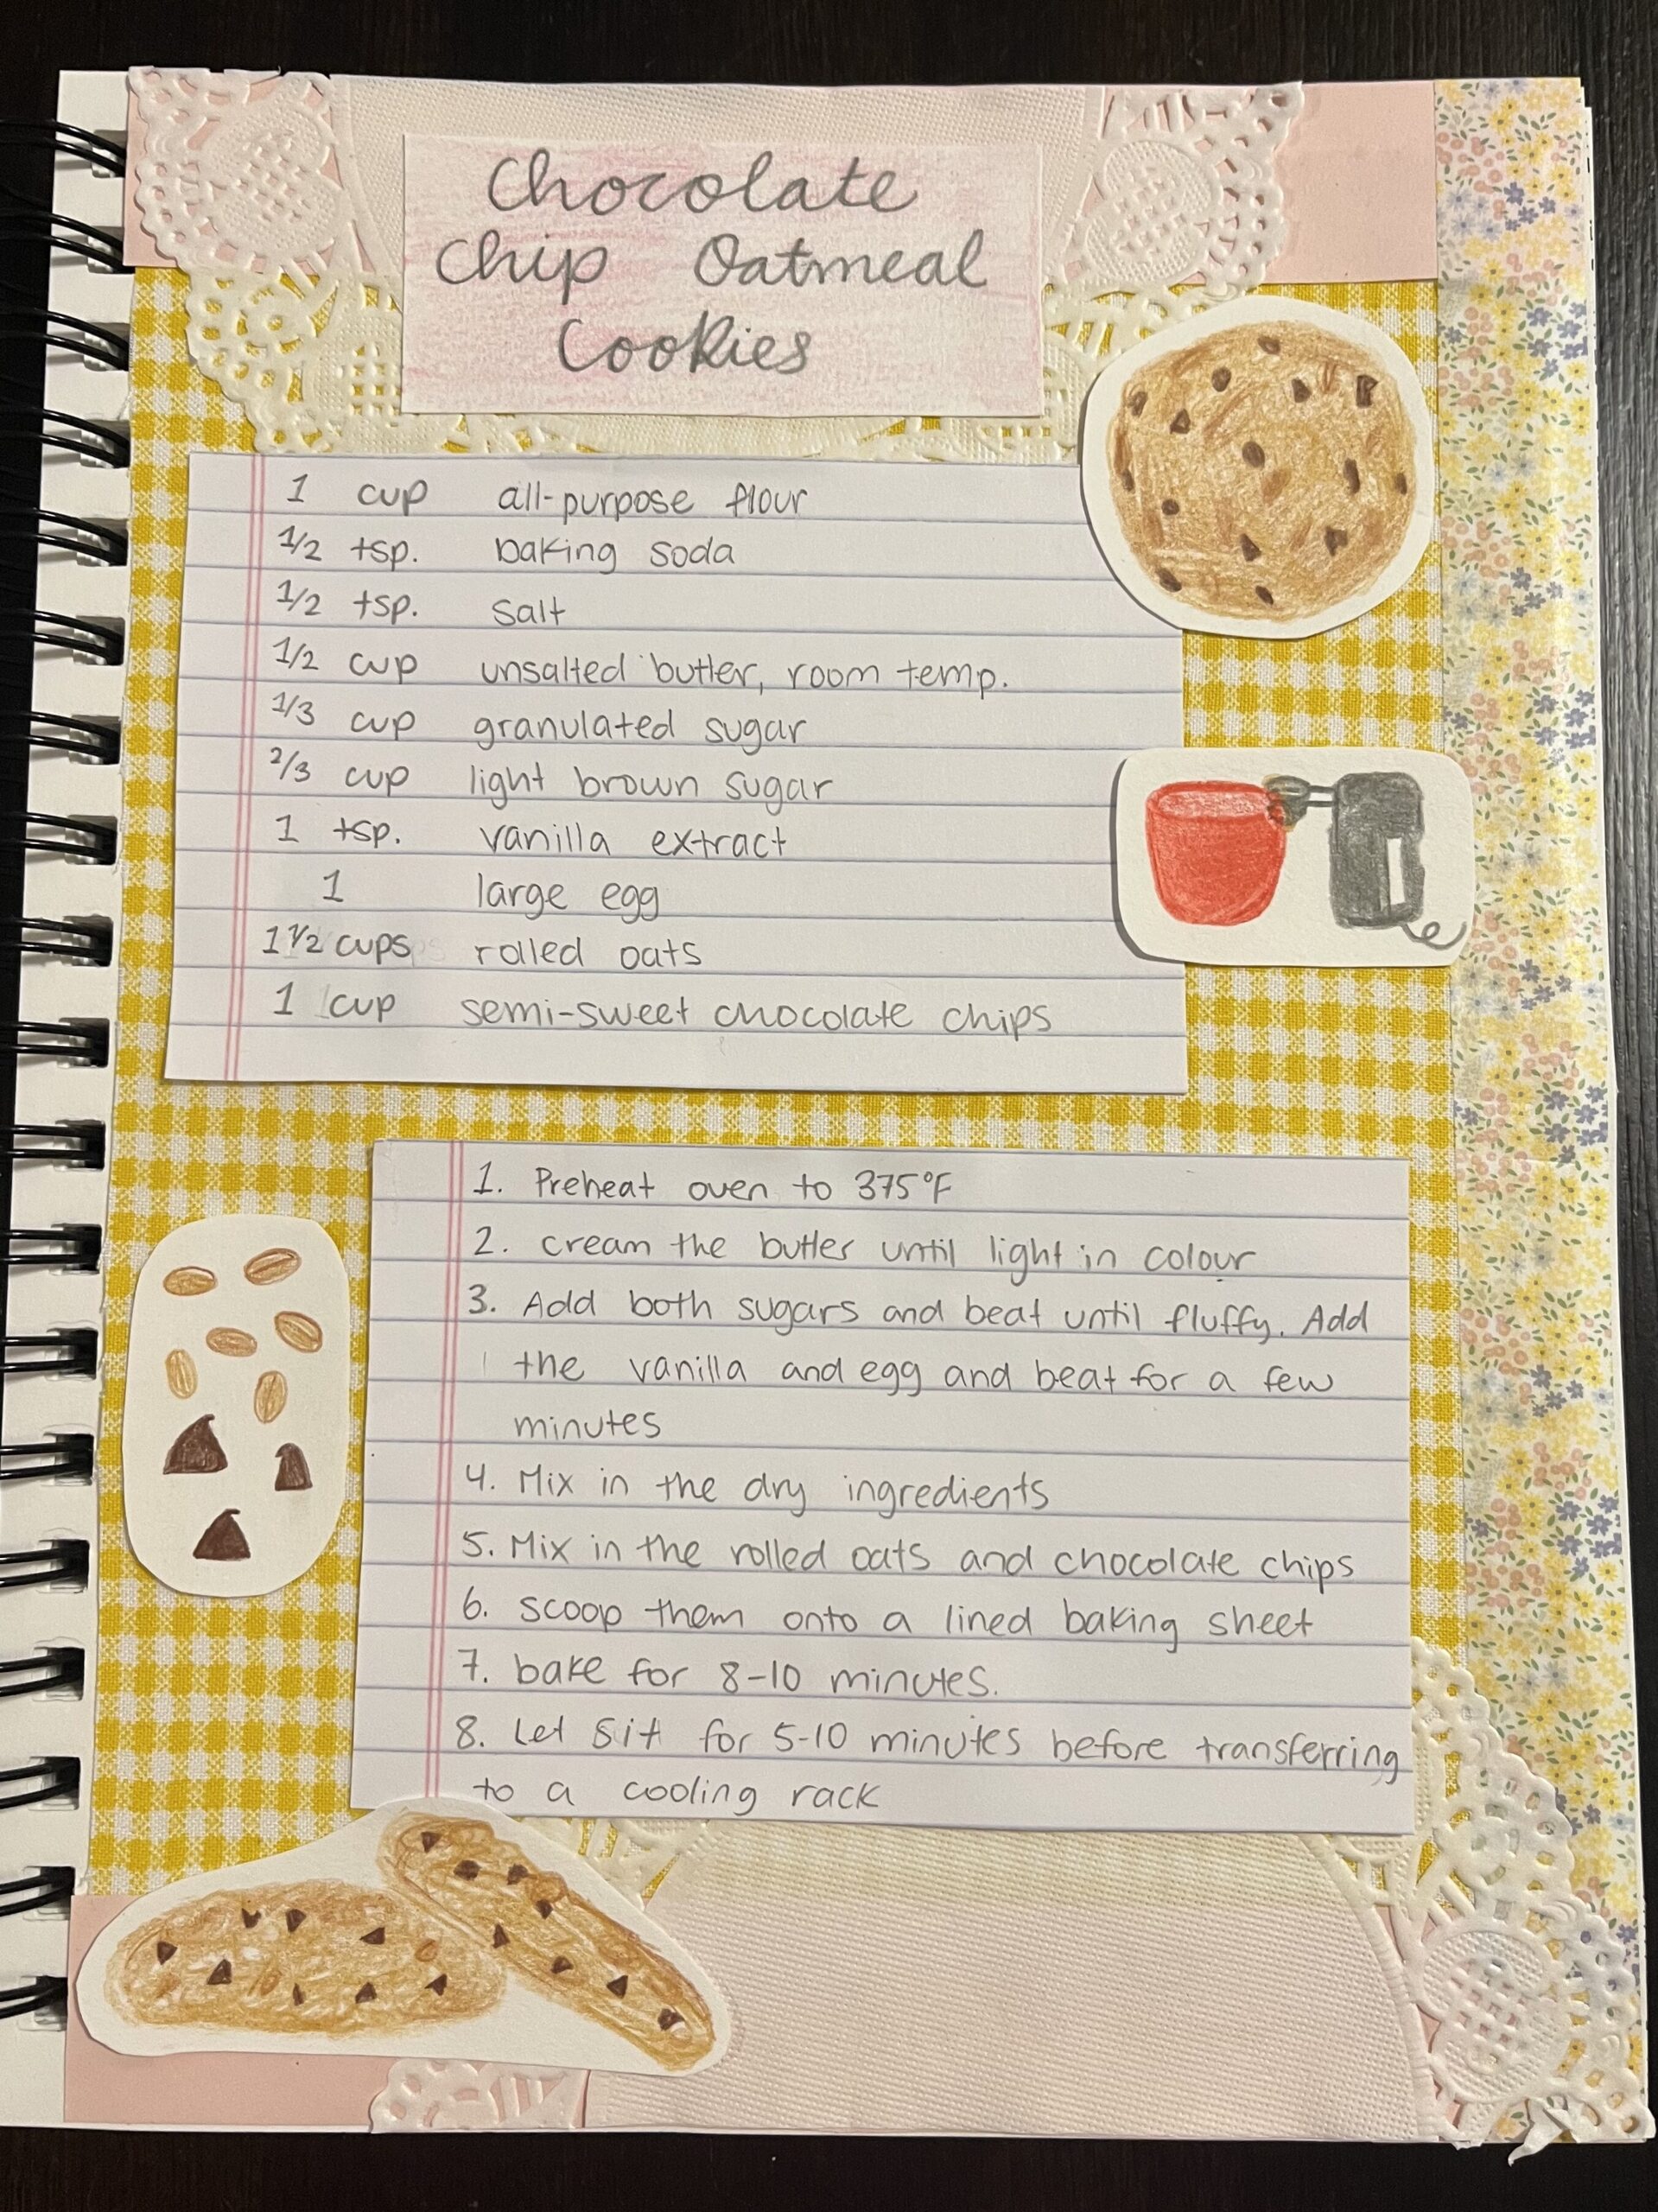
After I cut out the plates, I cut some pieces of lined paper to fit, then wrote out my instructions and ingredients. The next step was to make a title card. I took another flip through the cookbook and found a pattern that I liked and I thought matched the other colours on the page. I cut a small piece out and glued my recipe title to it.

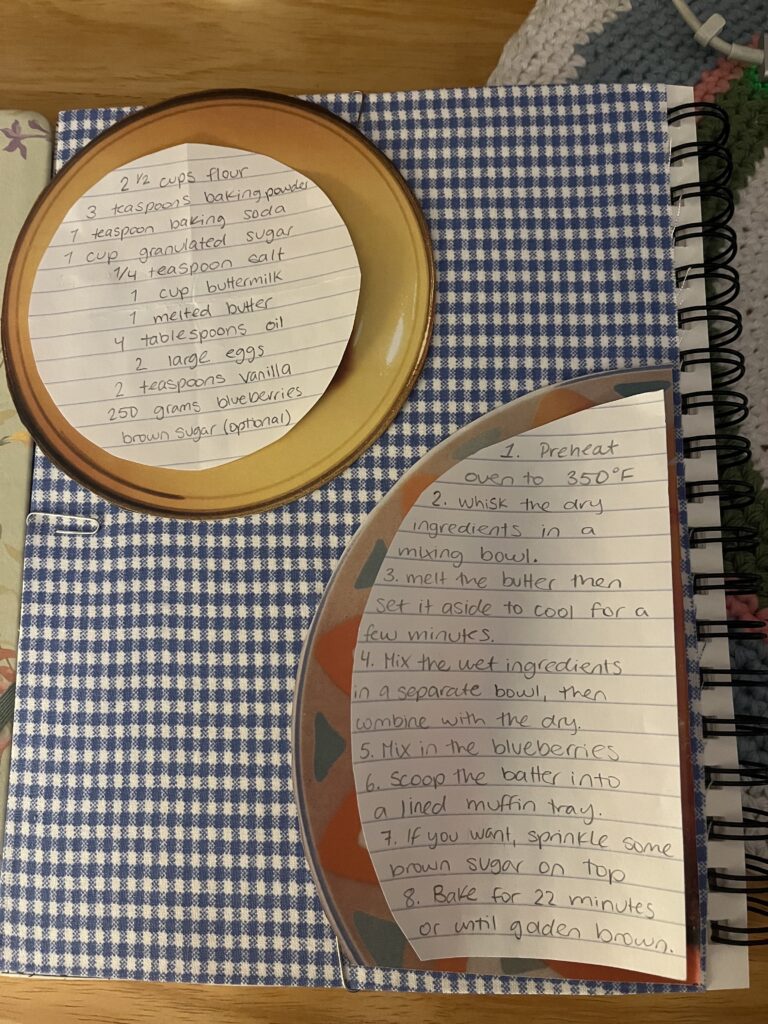
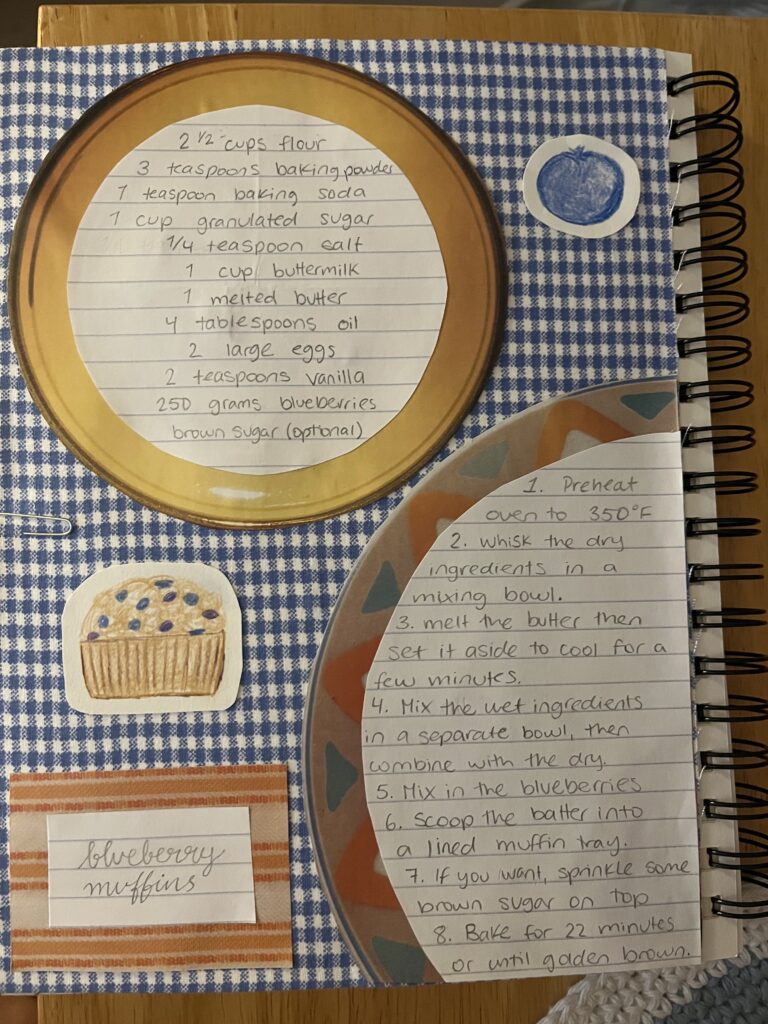
For my drawings, I decided to do one blueberry muffin and one single blueberry. I positioned all of my elements on the page and once I decided on an arrangement that I liked, I glued them down.

I’m really happy with how the page turned out and I am definitely going to use more patterns from the cookbook for future pages. The muffins turned out great as well! Next week, I will be making a year-round favourite of mine: Apple Crisp!
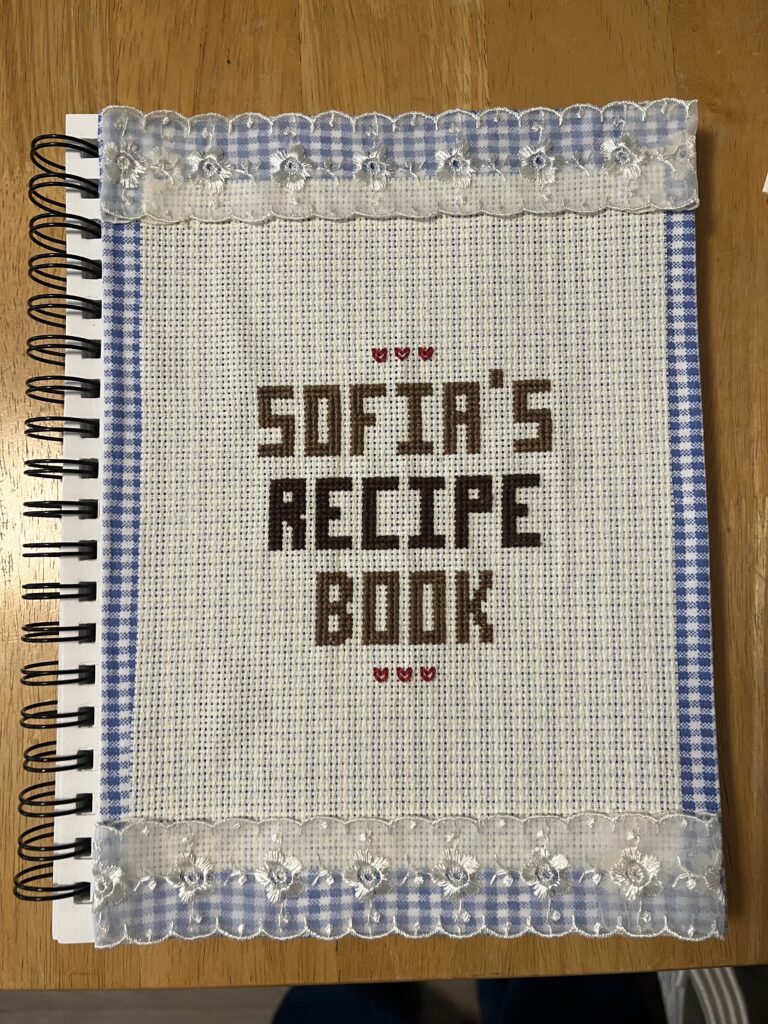
— Sofia 🎀

Reflections on Multi Access Learning Pathways

In class a few weeks ago, we had a great discussion about multi-access learning pathways in school environments. We discussed the different ways this can look, the benefits of it, and real examples of implementations of this model at the University of Victoria. If you would like to explore the subject further, here is the link to the presentation by Valerie Irvine.

I find this model very interesting because I have never experienced this learning format before. I have taken fully in-person classes and fully online classes, but never a course that had options for both that students could choose between. I have experienced in-person classes that integrated online learning in the case of a teacher’s illness or extreme weather conditions, but the option of attending class online was not a frequent option.

While, I am generally on board with this model, I have some personal reservations. Through all my years as a student, I have always felt that I learn and focus best when I am physically in a school environment. I wonder if I would focus as well if I attended online class on a more regular basis. Even though I personally would prefer to attend class in person, I appreciate that the multi-access learning model opens up ways for all students to be able to participate in the course in their own way. Some students have a long commute, some have children or other family members to take care of, and some have health-related issues that prevent them from attending class in-person. Additionally, the multi-access learning model allows for change. You could attend class in-person one day, and the next day attend online. If you are having an off day, or something comes up, there are options for participating in an environment that works for you.

In our course, we have also discussed how this model can be applied to elementary school classrooms. One of the suggestions was to create a blog for your class so that parents of children who miss school could catch up on the material that was missed. I like this idea because it creates a way for students to stay up to date, for parents to be able to see what is happening in the classroom, and it creates a record of the teacher’s lessons and activities for future years.

Thinking more about the multi-access learning model made me reflect on how I could implement it into my future classroom. I found a book titled “Online by Choice: Design Options for Flexible K-12 Learning” by Stephanie L. Moore and Michael K. Barbour that discusses different options for blended learning in schools, meeting learner needs, and building an online community. I haven’t had a chance to read the whole book yet, but I have already found it really helpful in terms of guidance for implementing online learning options in the classroom.

Although online learning is something that can make me feel uneasy, I am open to exploring ways that I can implement it in my future classroom with the end goal of helping my students. I think an approachable way of starting with this would be to create a class website or blog, and then different things can be implement as you go. I appreciate that multi-access learning and blended learning can create ways for students to be active in the classroom in a way that they wouldn’t necessarily have been able to with out it.

— Sofia 🎀

Lasagna

This week I made my lasagna recipe, which is my only savoury recipe from my collection. Although I mostly bake, there are a few meals that I used to cook for my family (usually lasagna or pasta). I started making this recipe because I wanted to eat lasagna that didn’t have ricotta cheese in it. I have always been a picky eater and was never a fan of the texture of ricotta. So I decided to make it in the way that I like.

Above is the recipe from my folder. I realized once I had already made it’s page in my new recipe book that there are some things that I usually add in that are not in the ingredients for this recipe. For example, I usually add in oregano and basil to the sauce before beginning the layering process. Although I’m disappointed that I didn’t think to add them in as ingredients, this serves as a good reminder to me to think about what has channged in my recipes since I started making them.

I started my process as usual: by cutting a piece of paper for the background and gluing it down. Then I wrote down the ingredients, instructions, and title of the recipe. For this page, I went to Michael’s to look for a patterned piece of paper. I have some background paper that could work but they are all lighter and mostly pink. I associate Lasagna with the colour red (maybe because of the tomato sauce), so I wanted to find a special piece of red paper.

Next, I worked on some drawings to add as decoration on the page. The first thing that I drew was a piece of lasagna. I tried my best, but I am no artist. It ended up looking more like a piece of cake to me, but hopefully because the recipe is named “Lasagna”, it will be clear. Then I started arranging the elements on the page and made some more drawings.

My next drawings were an onion, and a lasagna noodle. As opposed to my recipe last week, I was struggling to think of memories or associations that I have with this Lasagna that I could channel into my little drawings. So instead I just drew some of the ingredients.

The final image is of the finished lasagna (after I cut out a piece for my dinner). The lasagna turned out great and reminded me of home, which was the best part. I love this recipe because it’s simple and things can easily be changed, added in, or removed. For example, If you like ricotta cheese in your lasagna, you could add it as a layer. I have also experimented with adding different vegetables into the sauce like carrots and bell peppers, and for this most recent time, I added zucchini. I also imagine that it would work to change the ground beef for a different kind of meat. Or even make a vegetarian lasagna!

Stay tuned for next time, when I make my blueberry muffin recipe!

— Sofia 🎀

Boesch Chocolate Cake

This week I worked on the page for a family recipe that I learned from my dad, who learned from my grandma. The photos above are of my grandparents farm in Salmon Arm. We didn’t get to visit often but my family’s trips up there were so special growing up. They had cows, sheep, chickens, a donkey, and a handful of cats and dogs. They even have a big hilly field that my brothers and I would sled on in the winter.

photo taken by Eileen Huster

My dad taught me how to make this recipe when I was little, and it introduced me to my new favourite way to melt chocolate. The recipe calls for melting the chocolate in boilling water: you break of the chocolate into a bowl, pour hot water over it, and let it sit for a few minutes. Then drain the water and have perfectly melted chocolate. I remember when I first tried it I was hesistant about it but it always turns out smooth and I don’t have to worry about the chocolate getting burnt in the microwave!

I also have fond memories of making this cake with my cousins when I visited in the summer. My grandma’s birthday is in late august, so when we visited before the beginning of the school year, we got to celebrate with her. I would go over to my cousins’ house and we would bake it together and enjoy it with our family in the evening.

Above is a scan of the recipe page from home. I believe my dad translated it from my grandma’s recipe book, which was in German. Before moving to Canada, my dad and his family lived in Germany, but my Grandma is Swiss, so this recipe comes from my extended family in Switzerland. I love making this recipe because it’s different than other chocolate cakes online, and it’s a nice way to feel close to my Swiss roots.

photo taken by Sofia Huster

I started the process by covering the page with a music sheet from the old music book I thrifted. I chose to do this as a nod to one of my favourite memories from visiting my grandparents: playing on their piano. I learned to play when I was five and continued recreationally until I was about 13. I wasn’t a master, but my grandparents always loved it when the piano was in use and it was nice to play for them because I didn’t see them very often.

Next, I wrote out the ingredients and instructions on lined paper and layed them out on the page. I made a small title card and added that as well. I then glued everything down and started on my drawings for the page.

photo taken by Sofia Huster

Using my coloured pencils, I drew a slice of the cake, a cherry tree, a sheep, and the hilly fields from my grandparents’ property.

Unfortunately, I wasn’t able to make the recipe in preparation of this blog post. The recipe requires you to beat the egg whites until they form firm peaks, and I am unable to do that without an electric hand mixer. I’m sad I wasn’t able to make and eat some of this cake, but I look forward to making it next time I visit home!

Next week, I will be making my lasagna recipe, which is my only savoury recipe from my collection!

— Sofia 🎀

Reflections on Open Education in K-12 and Cable Green

A few weeks ago, I watched a session with Cable Green, the director of Open Education from Creative Commons. He had a lot of interesting things to say about access to educational resources and barriers in our education system. When I looked into his role on the Creative Commons website, I found that he “works with open education, science and research communities to leverage open licensing, content, practices and policies to expand equitable access and contributions to open education”. I linked the Creative Commons website and the page about Cable Green above if you would like to learn more about what they do!

He started by talking about what inspired his work with open education. He explained that the late 1990’s and early 2000’s brought lots of change to education with the creation of the world wide web and increased access to computers and laptops. This lead to a unique opportunity to be able to share resources with people all over the world, the only problem being that everything is copyrighted by default. So Creative Commons created a way for people to share their knowledge and retain their copyright, but also allow for other people to use and modify your resources.

I find this topic very interesting, especially because I don’t know as much about copyright as I should. I am more familiar with copyright in the context of books, because I’m used to opening up the first page and seeing the the copyright and publishing details. To seek more clarification on exactly what copyright is, I found this great video on Youtube made by Innovation, Science and Economic Development Canada. I linked below for anybody who would like to take a look.

Also on the Creative Commons website is an “About CC Licenses” page about the different types of licenses they offer. The most permissive option is one that allows reusers to “distribute, remix, adapt, and build upon the material in any medium or format, so long as attribution is given to the creator”. This license allows for the most change from the original material and requires that the original creator is given credit. At the other end of the spectrum is the most restrictive license, which allows “reusers to copy and distribute the material in any medium or format in unadapted form only, for noncommercial purposes only, and only so long as attribution is given to the creator”. I think these licenses are so interesting and a great way to share resources with people around the world! It seems like an easy enough process and allows for more access to knowledge in all kinds of situations.

Learning more about copyright and Creative Commons led me to think about how I could teach these topics to my future students and encourage digital literacy in my classroom. I found a great article on Edutopia.org titled “How to Teach Copyright and Fair Use to Students“, by Karen Lagola. The approach to introducing this topic certainly depends on the grade you’re teaching, but I think this article has lots of great tips that could work for all grade levels. For example, one of the suggestions is to “Empower Your Students as Creators”. I think that this could work as early as Kindergarten. Although they are probably not posting their work on the internet, the principle of respecting their work and them as creators of it is important to introduce. Once you get to the older grades, you could start introducing them to the terminology, what it means, and guiding them through the processes of creating their own licenses for their work through Creative Commons.

I’m glad that through this online recorded session I was able to learn more about copyright and Creative Commons licenses. As I enter my teaching career this is something that I hope to teach my future students about. Technology in our world is only becoming more abundant and innovative so it’s important that young students know about how to properly interect with other people’s work on the internet.

I hope that this post can be helpful to others like me who don’t know a lot about copyright and Creative Commons licenses, but would like to. I’m happy that during this process I found some resources that can hopefully help my future students as well as other teachers.

— Sofia 🎀

Chocolate Chip Oatmeal Cookies

Photo taken by Sofia Huster

This week, I will be making the page for my Chocolate Chip Oatmeal Cookie recipe. Out of all of my recipes, these cookies are my most frequently made and they are a big favourite in my family. So, it felt right to have this recipe be the first page in my new recipe book! I wanted to pick something that is classic and one of my most used recipes.

Chocolate chip cookies are a staple and it can take a long time to find the right recipe. So once I started adding oats, it was a game-changer. I like these more than regular chocolate chip cookies because I find that the rolled oats give the cookies texture, volume, and extra fibre!

To start my process, I made the cookies using my old recipe page:

photo taken by Eileen Huster

The process and final result were very different than usual, considering my kitchen is different and I didn’t have all the tools I usually do. One unfortunate thing that happened is that I accidentally added the wrong amount of baking soda and salt. Because I have new supplies that I am not used to, I read the 1/2 tablespoon scoop as 1/2 teaspoon. I also had to get used to my new oven, which is electric, as opposed to the gas oven I’m used to at home. Overall, the cookies turned out great and I learned that I need to double check the measuring spoon I’m using!

For the process of making the page for the recipe book, I started with choosing a background: Yellow gingham. I cut out a piece to fit and glued it on, finishing the top and bottom edges with light pink paper. I then cut out some pieces of lined paper and trimmed them to fit the page.

After creating the base for my page, I copied the ingredients and instructions for the cookies onto my lined paper cards. Next, I used my coloured pencils to draw some chocolate chip oatmeal cookies for decoration.

Before gluing the elements to the page, I made a title card and added some of the paper doilies I bought. I then glued on the ingredients and instrcutions cards along with my pictures, but I thought that the page needed something more. So I drew a few more things to add to the page.

If I could do something different next time, I would write out the recipe before cutting out the lined paper. It ended up looking nice, but I had to purposely write smaller so I could fit everything on the cards.

In the end, I am very pleased with how the page turned out! I think it was a good choice to make this recipe the first in my book and I really enjoyed baking these cookies!

Next time, I will be making the page for “Boesch Chocolate Cake”, a family recipe passed down from my grandmother!

— Sofia 🎀

Reflections on the Pacific School of Innovation and Inquiry

This week, I had the pleasure of touring the Pacific School for Innovation and Inquiry in downtown Victoria, founded and co-run by former Gulf Islands School District Superintendent Jeff Hopkins. Our class had the opportunity to hear from Jeff, tour the school, and speak with some of the students. I entered the experience not knowing what to expect, and I left inspired and intrigued.

Jeff started the session by talking to us about the mission behind the school and how the school works. The students choose an inquiry question and attend sessions that help them along with their research and broaden their knowledge on related topics. By exploring their inquiry, the majority of students meet curriculum requirements and sometimes even graduate early. At first, I was skeptical about this model of schooling, but after hearing Jeff speak about the school and answer all of our questions I found myself wishing that I could have gone to a school like this when I was in highschool.

photo taken by Sofia Huster

My favourite part of the tour was getting to see the creative working space. As a sewer and general textiles enthusiast, seeing this space was so exciting. They have tons of bins of fabrics and other materials, sewing machines, sergers, mannequins, and even a loom for weaving. I couldn’t help but imagine all the projects I could make and how it could all connect to learning outcomes in other subjects. The textiles space is not the only creative workspace they have. The studio also houses a small theatre, a small woodworking shop, a ceramics studio, and music rooms.

Another thing that stood out to me was a term that Jeff mentioned: the Zone of Proximal Development, developed by Lev Vygotsky. I recognized the term from my Grade 12 psychology course, but it was interesting to hear Jeff talk about it in the context of the school’s approach. The diagram below is a visual for the term. Essentially, it describes the zone between what is too easy for a learner and what is too difficult. The zone represents the optimal content that challanges someone. Jeff mentioned how this term is very important for the school’s model but also for us as elementary school teachers.

Zone of Proximal Development Diagram, PSII Victoria

Overall, I’m grateful for the opportunity to have toured the school. I had never been exposed to this type of school growing up and I think it would be so cool to be a student there. We had the chance to talk to some of the students and they seemed so focused and inspired. I very curious to see how this model of school will expand and how its approach can be implemented in more schools in the future!

— Sofia 🎀

The Cover Page

Photo taken by Sofia Huster

Before I could start filling up my new recipe book, I had to make a cover page and gather some materials that I’ll need for this project.

I started by going to Michael’s to get a small multimedia book, pencil crayons, an assortment of pink paper, and some paper doilies. I plan to use the pencil crayons for create drawings of the food I make; The pink paper is to use for the background of the pages; and the paper doilies are to use for decoration on the pages.

I also stopped my the thrift store to look at magazines and picked up an old recipe book with great baking pictures, and a music workbook. I love the look of sheet music, so I am hoping to use some for the background of some of the pages.

My cover page process started with wrapping the page with a blue gingham fabric that I had in my craft basket. I love gingham patterns, so I have been collecting some as I see them in stores. After folding over the edges I covered the back with a piece of light pink paper to create a more finished look.

I then had to decide how to make the title, the verdict was cross-stitch. I have done small and big cross-stitch projects before so I am familiar with the skill and the process of designing a pattern. The tool that I use is FlossCross, an online pattern creator that has all the DMC thread colours for easy physical re-creation. Once I planned out the pattern I got started on stitching it onto a piece of off-white 14-count Aida cloth I had from a previous project. After stitching the pattern I glued it to the blue gingham cover page and added some lace as a finishing touch.

I love cross-stitch because of the finished look and I find it the process of it very peaceful. If you are new to cross-stitch or want to try it out, here is a great tutorial on the two main cross-stitch methods that I found useful when I first started:

This video explains the main cross-stitch methods, but there are lots of other great videos on youtube that explain how to start or finish a row of stitching in more detail.

Overall, I am really happy with the way the cover turned out. When I take on new craft projects I often get disappointed when my end product doesn’t meet my expectations. While I may have big ideas, my actual skills are sometimes not enough to recreate them the way they are in my head. So for this cover page I wanted to make something that showed off my personality and preferences but was still simple.

Now that the cover is done I am ready and excited to get started with my baking and crafting. Stay tuned for my next post on my classic chocolate chip oatmeal cookies!

— Sofia 🎀

Reflections on the “Most Likely to Succeed” Documentary

Most Likely to Succeed” is a documentary film directed by Greg Whiteley, released in 2015. The film explores new perspectives to education including a relatively new approach from High Tech High School in San Diego, California. The school’s focus is heavily weighted on “soft-skills” like confidence, leadership, and group collaboration. While focusing on two Grade 9 classes, the film shows the process of their learning throughout the year. Each class works with two teachers, for example one physics teacher and one humanities teacher. The students would explore both subjects and at the end of their term, create a project to feature in the school’s showcase, open to the students’ families, friends, and community.

This approach fascinated me because this is not something that I had seen or considered before. In theory, the emphasis on entrepreneurship, leadership, confidence, and collaboration in a high school setting is a great idea, but like some of the parents of High Tech High students, I was a bit skeptical. The parents’ main concern is that their children won’t be able to succeed on standardized tests that will secure their way to a post-secondary institution.

In the film, they explain the reasoning behind High Tech High’s approach. Their rationale is that while students in standard secondary schools pass tests and get accepted to universities and colleges, they don’t retain any knowledge from their courses long-term or learn any useful skills for a world outside of school. So, High Tech High aims to teach kids those skills through an in-depth exploration of some subjects, rather than a surface level one of a wide breadth of subjects.

I do agree with their reasoning, but the unknown results fo this experiment made me nervous while watching the film. Ten years ago, when the film was released, High Tech High was still relatively new. So there wasn’t any information on their long-term success rates in the film. As I looked into the current success rate of the program on the High Tech High Website, I saw that 82% of their graduates in 2022 attended college and that 95% of their senior students “indicat[e] readiness for college-level coursework”.

The video above, is one that I found on youtube while exploring High Tech High. It shows a preview into a class at High Tech High creating video games and interactive art pieces inspired by their conversations about propaganda and social movements with their English teacher.

As I reflect more on the glimpse into High Tech High from the documentary and the youtube video, I keep thinking about how cool it would have been to do a project like that when I was in school. Projects like making a mechanism out of gears that represents a theory on the chute of civilizations, or the daunting task of writing and producing your own play on Ancient Greece seem very nerve-racking to me. However, I imagine that the students must feel so proud and accomplished when they present their projects at the showcase.

Even if the students at High Tech High do not follow a traditional school model, I have no doubt that they are learning useful skills for their adult life. I recognize their rationale and I’m curious to see the results of the school after a few more years. Overall, I think it’s great that they are trying something new that will hopefully inspire generations of innovators and leaders.

— Sofia 🎀

Let’s Get Started!

Ever since I was little, one of my favourite things was to help my mom bake in the small kitchen of my childhood home. She would set up a little stool for me to stand on and give me instructions on what to mix together, remaining calm when I created a flour explosion or accidentally allowed too many egg shells into our bowl. She baked all of our Christmas cookies, birthday cakes, and muffins for our lunch boxes every week.

The pictures above are of me and my family members with the beautiful birthday cakes that my mom made.

As I entered my double digits, I reached the age when I could cook and bake by myself, so I got started on trying to be a baker just like my mom. Even though my mom still baked for us, I started to make my own baked goods. I fed my family chocolate chip cookies, brownies, blueberry muffins, and more. I even started making my own birthday cakes, still with some much needed assistance from my mom.

Mirror glaze cake made by my mom and me for my 14th birthday, photo taken by Sofia Huster

Now, I have a little folder full of recipes that I have collected over the years and in little ways I have made them my own. I held onto them with the goal of one day having my own recipe book that I can pass on to my children with the hope of giving them the same happy memories I have when I think of baking with my mom.

And so, I thought of an idea for this blog that would combine my love for baking and my passion for multimedia projects. My goal is to create a recipe book with hand crafted pages for each of my favourite recipes that I can add to and pass down one day to my family. I hope to make each recipe as I create its page and post my culinary and crafting process.

As the title says: let’s get started!

— Sofia 🎀

© 2025 Sofia's Blog

Theme by Anders NorenUp ↑